
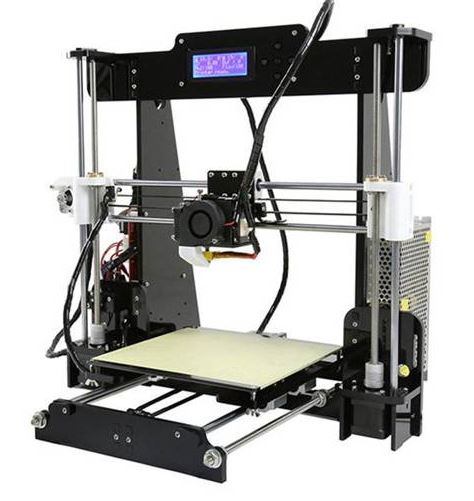
The Anet A8 is a cost effective introductory printer into the 3d printing world.
As a build it yourself model, it is up to you how you modify it.
The standard build is good and will teach you a lot about 3d printing.
But it can be improved on easily and cheaply.
Detailed below are 5 mods for the Anet A8, in my opinion, which are worth doing quite quickly after you have built the printer.
The mods which I am proposing are :
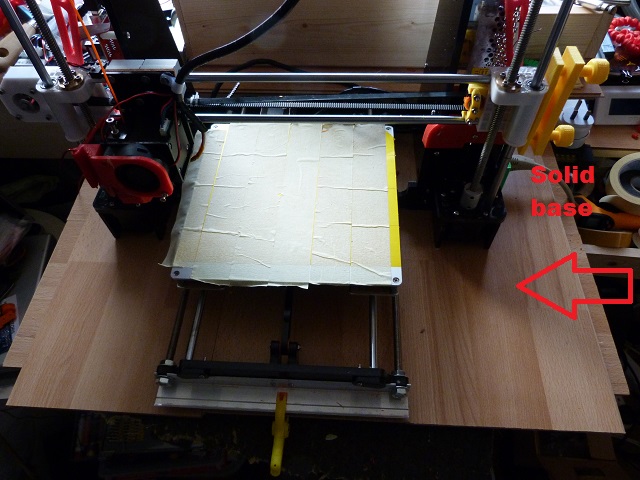
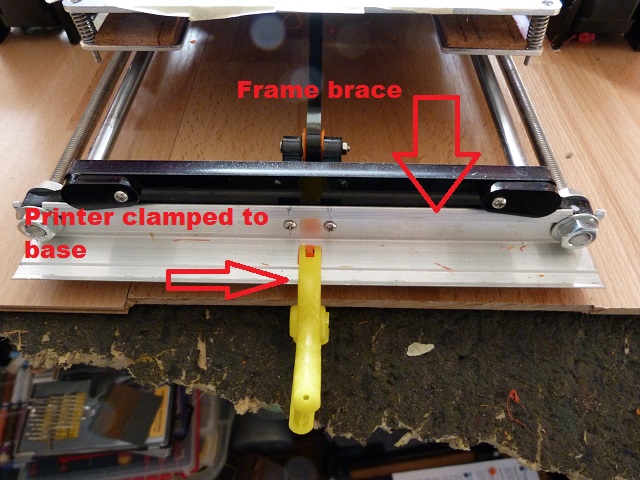
Solid Base Board
This is required due to the construction of the printer.
With the two threaded rods coming forward from the middle the printer will allow the front to be raised without the rest of the printer being lifted. This will cause the build platform to raise at the front throwing out your careful calibration.

Knowing that, at the start this is one of the most frustrating parts of getting a 3d printer to work then why have a flexible joint at the middle of the printer?
All that needs to be done is to get a piece of wood, I used a spare laminate floorboard – maybe you can get a free sample :) – cut it into three equal pieces and you have a stable base for your printer.
You could go one better and screw it down to this, this will reduce the movement even further.
If you are worried about the board scratching the surface – or are concerned about the noise then put a piece of underlay or foam under the base board. With the board keeping the printer rigid then you need not worry about the Z height calibration being messed up.
Mains Switch
If you build the printer as standard then you will have wired the mains on the power supply to along lead to be plugged into the mains socket.
If anything happens to your printer and the socket is on the floor, you will need to bend down and unplug the printer to switch it off.
A better method is to install a mains switch at the printer. Including a cover for the lower part of the power supply will also stop any fingers coming close to the mains connections.
I printed one of these off and installed a fused double pole switch.
Now I can start and stop the printer with ease and I don’t see the flash of the current surge when I plug the mains lead in.
I changed the mains lead to a ‘kettle’ lead or as it should be know an IEC lead.
The (#amazon link) switch I bought came from china, took a while to get here, and came without a fuse. You will need a 20mm fuse to fit this type of switch and it is worth keeping a few in stock just in case it blows.
Now with this installed it is easier to move your printer – just unplug the kettle lead and pick up the base board and relocate it. In theory the Z height should still be ok and you can start printing again.
Note: there will be a post on how to wire this in in the near future
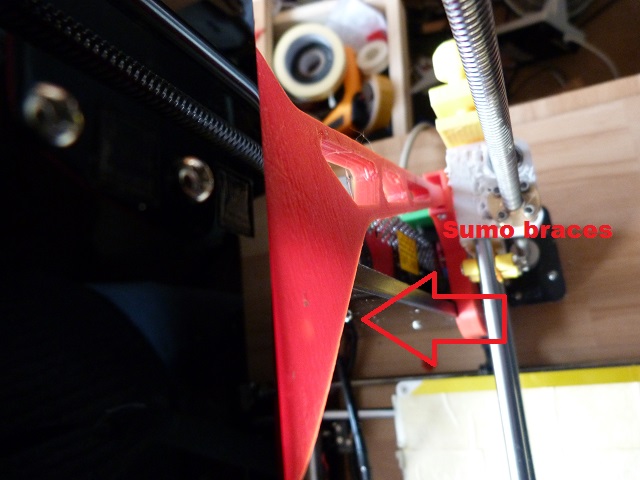
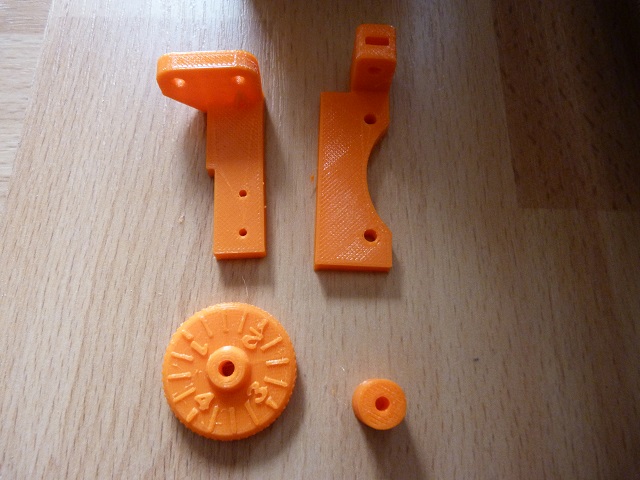
Hulk Frame Braces.
With time you will start to print taller and taller items.
What you will find with the stock printer is that the top will start to move as the X axis increases in the z height. It doesn’t need much movement to ruin a print, so to stabilise the frame I would suggest printing out a left and right hulk frame brace., along with their respective lower brackets.
To fit these you will need to unscrew the top plates from the printer, if you do them one ata time then it is easier to keep the rest of the printer in one piece.
So unscrew the left top plate and loosen the screws for the top front, holding the display.
Unscrew the top middle plate screw – this will be used to secure the bottom plate onto the frame.
Use a spare screw you have left over from the build ( m3 x 20) along with a nut to screw the bottom bracket and upright arm together.
Fit the bottom bracket and screw into place.
You will need to pull the top front plate forward to fit the upright arm, ensure that it fits correctly over the upright frame piece.
The top front plate can now be reinstalled , along with the top plate.
Ensure all of the screws are tight – but don’t overtighten.
Do this for the other side and you will have installed your sumo braces.
Your printer will now be a lot more resistant to movement when printing higher up and will increase your chance of successful printing.
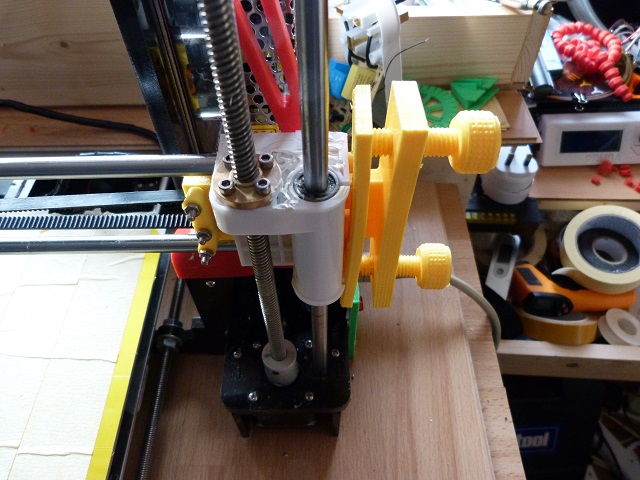
Belt Tensioners
Building the Anet A8 gives you good experience in what is involved with producing a 3d printer.
There are a few bits where the manufacturer has cut a few corners, one of them, in my opinion is belt tensioners.
The belts are the primary movement method for the X and Y axis.
Taking the y axis, the stepper motor is moving the print bed forward and backwards. If the belt is loose then this can overshoot, causing print problems.
Similarly with the X axis, if the belt is loose then the print head will overshoot causing print problems.
These print problems can be sorted with belt tensioners fitted to the X and Y axes.
Print off the parts from thingiverse for the X belt tensioner and fit them, you will need to adjust the belt length to compensate for the tensioner.
Don’t overtighten the belt, remember it is plastic, you are better off replacing this with a (#amazon link) rubber one.
With the print head over to the left, if you twang the lower part of the belt and it makes a low thrum then it is tight enough. If it makes a high pitched thrum then slacken it off a bit and thrum again.
Replace the Y axis front idler with the Y axis tensioner.
Don’t overtighten the Y axis as this can cause the frame to break.
What I have done is to add a piece of aluminium angle to the front and rear frames of my printer to prevent the front and rear frames from flexing. I had to cut the bracket out for the two large threaded bars and the screws in between. The front one is fitted onto the outside of the printer as is the rear one.
These brackets can be used to screw the printer down to the base board easily.
Fitting the Y axis tensioner is easy with the brackets fitted and the tension on the belt is adjusted as with the X axis.
You should notice an improvement in the quality of your prints after fitting the tensioners, along with te brackets front and rear.
Fan duct.
Cooling the extruded filament is crucial in respect of forming fine detail and forming bridges.
The standard fan nozzle does a good job, but can be improved on.
The nozzle I suggest printing is the Mistral v2.1a.
See my post on the testing I carried out to select this nozzle.
Your prints will have all the detail you want after fitting this nozzle.

Ah! and another one to sneak in
6. Z stop fine tune
This one is important, but can wait for a bit.
If you don’t do this then at least make sure your Z stop screws are tight. If the z stop moves when you home your printer you will never be able to setup your bed to be level. I know this as mine was slightly loose and I had to keep releveling the bed and the nozzle would drop slightly, every time.
Again it is a print of parts from thingiverse. With this you are able to very finely adjust your Z height.
Once your bed is level and you find your nozzle is too high or too low then you can curse. This is because you will have to undo the Z axis stop and adjust it up or down and then tighten it up again. Using the standard Zstop this adjustment is very coarse, I mean very coarse. So with this modification you are able to adjust your Z height within a gnats whisker. The thread on a M3 screw is 0.5mm pitch – meaning for every turn you adjust the height by 0.5mm, so a quarter turn will adjust it by ¼ * 0.5 = 0.125mm. So this mod is definitely worth it.
What mods have you done ?
So these are 5 6 mods for the Anet A8, which could be done to most DIY cartesian printers.
Hopefully if you have carried these out you will see an improvement in your print quality.
What I found is that with the base board I was able to set the Z height and leave it. Prior to this I would come back to the printer to find that it had adjusted itself.
If you have any mods, other than these 5 mods for the Anet A8, which you think the printer could do with, please leave them in the comments box below.
Thanks for reading
Phil