
Setting up your 3d printer is similar to printing that test page with a new printer…
Setting up a temperature tower in Cura and printing it will tell you a lot about the

filament and your machine…
Once you have printed a few of these with various filaments then you may not need to print as many, or you may find that they really do help you dial in your machine.
So if they are so useful then let’s find out a bit more about them…..
What is a temperature tower
3d printing is not an exact science…
I can’t give you my slicer settings and you expect the same results…even though you may have the same make and model machine…there are too many variances….
So you need to find out about your machine…
My settings will help you get close quicker, but to get the best out of your machine it is best to get into doing a process every time you buy a new filament…and record it….
A temperature tower is a model that is repeatedly printed at different temperatures to determine the characteristics of the filament at those temperatures. It can test for stringing, overhangs, bridging, strength of layer bond.
So a temperature tower is a complex model, appearing simple, with a lot of features designed to push your printer to the limits…helping you determine the best temperature to print the filament at…
There are several tower structures and i tend to stick to one and get to know it…
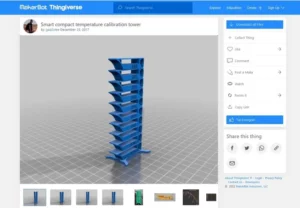
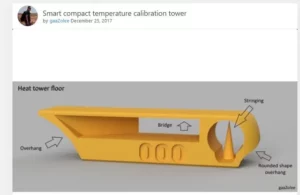
I use the Smart compact temperature calibration tower from Thingiverse….
This tests for overhang, bridging, rounded shape overhang and stringing…and i have found it will test for thin structures, although i don’t think that was designed in….
Why use a temperature tower
So why use a temperature tower…
Do you want prints that show off the best of your printers abilities…
Well you need to set it up and test…every material you print…

Until you get used to the settings…
And record them, so you can come back to them and reuse them…
And with the testing you can combine several tests into one and if parts fail then go to each section and then examine the feature in detail…
And this is what this temperature tower does…
You have stringing, overhangs, bridges and structural integrity…
And you are testing the material at different temperatures in one print….
How do you set it up
Downloading the STL model file you can open it up in Cura ( file open or drag and
drop it onto the bed)…
I tend to move it to the front left corner, just because i find it easier to print there….and my bed is slightly warped down in the center…
You can now start to setup the parameters for printing the filament.
I am using acenix silver 1.75mm pla…
I have struggled with this filament, it either seems too runny or doesn’t have good layer adhesion, so it is a good test of the setup…
Using the premade temperature tower the temperature range is from 225 down to 180C in 5 degree steps…
So we need to change the temperature every nth layer where the model repeats and starts again and we need to find out what the nth layer number is…
If we stick in standard settings…
So layer height 0.2, on a 0.4mm nozzle 0.8 walls, 20% infill, nozzle temp ( stick it to the max) 225, bed 50C, retraction 0.8mm at 35mm/s ( bit of a whoops here – see later…) and slice…
Looking at the 3hrs and 3 mins it will take to print i decided to reslice at 0.3mm and the time came tumbling down to 1hr 58 mins….
Viewing the sliced version of the model you can use the right hand slider to move up and down the individual layers to have a look at what is going to be printed ( it doesn’t show every thing as i had a pre printline created across the front of the bed to prime the nozzle…) but for this it is good enough…
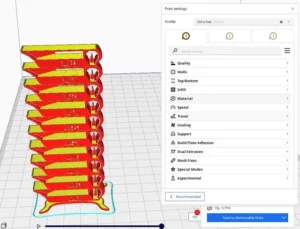
So take the handle right down to layer 1….
And then step it up until you see the right hand curve finish infill and get to a solid layer, should be around layer 49…
Then another …and another …and another….then you see the infill start again…
I took it that layer 51 was the start of the second section…allowing it time to cool by 5 degrees over that layers print.
And now you need to find the next transition….hint: around layer 101….
And keep going noting these down…
You will end up with 9 of these….all equally spaced apart…
Cura has a post processing section within the slicer…this allows you to modify certain settings…
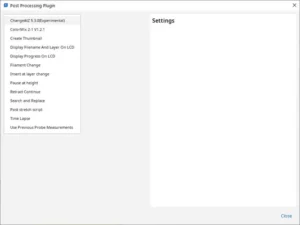
If you click on the menu – extensions>>postprocessing>>modify g-code…you get a popup box with two columns…
In the left column it will say ‘add script’ …clicking on this you get a selection of what can be post processed…we are looking for a changeatz or height…
Clicking on that adds a line to the left column and selections in the right column…
Go through and add the change at z 10 times, as i found i had to add a change at layer 1…
These changes are carried out from the top to the bottom, although i suppose as we are setting the change at layer xx then it doesn’t really matter what order we add them in…
But starting at the top …
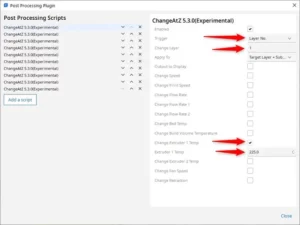
Click the enable box…
Drop the trigger down and select layer no…
Set the change layer to 1
Set the apply to to be target layer and subsequent layers
As we are interested in changing the temperatures…go down to change extruder 1 temperature and tick it…
Enter the temperature as the start temperature of 225
But looking down the list you can see what you can change, so if you have a model that requires changes to the standard settings at certain heights or layers then you can set them up here…but remember they stay…so if you don’t remove them then, in this case, the temperature will vary over the height of the model…
We are finished setting up the first one, so now click on the second line and go down enabling, setting the layer number and the temperature of the nozzle – getting lower by 5C every 50 layer increase…
Once you have gone through those then click on close and you will see that there is another box next to where you slice the model…
Go ahead and slice and save the model…
I have several slicers i use to see whether i have a model that may be printed and with
the temperature change i would look at it in craftware slicer….
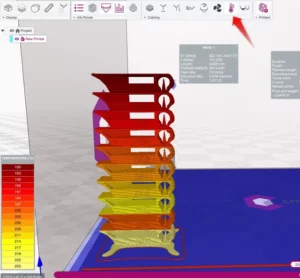
So dragging and dropping the gcode onto the virtual bed you get shown everything that will be printed, along with a box with the g-code in…
Across the top under coloring there is a temperature icon…clicking on this shows the temperature changes over the model…indicating that we have the correct g codes in there……
You can see it runs from 180 to 220 as this is the range presented in the temperature panel to the left…
And zooming in you see that the temperature changes on the last full layer of each section…
So we are good to print…
I prefer looking at the gcode (i don’t do it every time) just to see what anything special may do…and to make sure i don’t waste time and material…this model takes nearly 6m of filament to print, but will tell you a lot about how to use it….and it’s limitations…
So we are good to go…
Download the G-code onto an SD card, in my situation, you may have a Raspberry Pi with Octoprint added , but i would not recommend using the usb connection as i have seen numerous problems with this…the main one being erroneous codes being received ( but this is a possible buffer overrun inside the printer with corruption of the code sent)…
Print it out and see what it looks like…
How often do you need to print a temperature tower
When do you have to repeat this…
I would say that every time you change filament or carry out major ( changing the hot end ) repairs then it is worth going through this process…it will help you with cleaner prints that you want…so less waste…
By filament change i mean every reel, even the same manufacturer may alter the composition of the filament , use a different filler…so changing the characteristics of the filament….
But by doing this at the start you will find a pattern and record your results on a computer or a book…so you can refer back to the settings…
What do the results mean
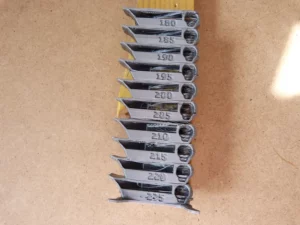
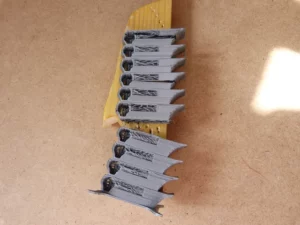
You can see mine all printed…
There is a lot of stringing and oozing where the travel movement is…
As i made a mistake and forgot to check the retraction settings ( as seen
above…0.8mm retraction won’t even take up the slack on a bowden extruder…you need to be looking at at least 2mm or more – another test coming on…) but you do see a difference between 210 and 205…
Looking at the overhang and curved overhang it looks best around the same temperatures of 205 to 210….
The bridging is best around 205C…
And the final test is the break test……
You may need pliers for this but try to break each section…i know it may sound daft, but if strength is what you need in your model then this will tell you the minimum temperature to have good inter layer bonding…
By hand mine stopped breaking easily at the 210C…
The stringing test on this was cancelled by the retraction settings and i will print out another one with reasonable settings…
The undocumented thing feature ( the left end where the overhang goes thinnest…
On mine with temperatures of above 205 there is a noticeable turn up as the material cools and shrinks….
So you can see from this test print i can see a lot of information about the filament and what i can do with it…
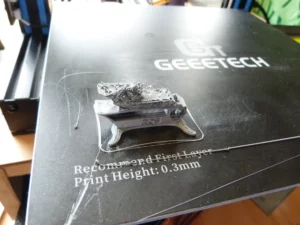
Just a note: i redid the settings with 3mm retraction and the second section failed…
How much filament does a temperature tower use
But doesn’t this waste a lot of material Phil….
Not really, ok you use nearly 6m of filament…but in a 1kg reel of standard pla you get around 330m of filament..so you are using 1.8% of the reel…but getting used to the printing characteristics of he filament without too much waste…
If you printed another model that had very thin sections at the top and used 100m of filament, printing at above 205C would possibly cause the thin sections to warp…( another use of post processing- change the temperature when getting to a thin section…)
So to improve your chances of a successful print i would really recommend going through this process and documenting it…
If necessary narrow the temperature range and redo the print to get finer results…
How long does a temperature tower take to print
As we saw above i went from 0.2mm layer height to 0.3mm layer height and shaved off

1hr 3 mins…to me this was significant…but looking at the information on thingiverse it was designed for 0.2mm layer height…
So maybe my printing speed could be increased to reduce the print time…
Again this is where you can test your printer and see at what speed the temperature starts to struggle on the hot end…and back it off a lot, by around 50%, to get results where the hot end is stable…
You are looking at the point where the hot end is staying on heating almost all the time, this is where any extra cooling will drop the temperature of the hot end, so making it unstable…you want to stay well away from that point…or change the hot end heating….
Is it worth doing a temperature tower
I really think it is…especially when you are using a new filament for the first time…
Or coming back to a filament after a lengthy period ( although your records should show what sort of results you got)…
The little time taken to create the model, check it and then print it…
Examining the results will show the sorts of results you are going to get with the model you want to print…
If it is structural and you don’t mind a few flaws then go slightly hotter…
If it decorative , then slow it down and cool it down to get more precise models, but longer print times obviously…
But you really do get to know your printer and the filament , keeping an eye on changes in your printers performance…
So thanks for reading and i hope you manage to setup and print a few temperature towers…
Let me know how you got on and whether you think it is worth doing these sorts of test…or do you just print the model you want and accept that you will get failures...