You know when you have one of those days you shouldn’t have switched your printer on. Well mine was now.
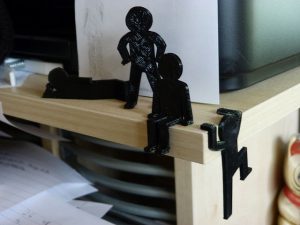
I just tried printing out thin man by walltosh, and di3 thumbwheel bed dial adjustment wheels i combined them in Cura.
These started off alright but very quickly became a 3d print failure. The filament was picking up dragging with the print head.
Ok, it happens – clean off the bed and start again.
Auto zero the machine and try again.
Nope it failed again. This time on first layer adhesion!
Clean off the build platform again.
Add some glue to the build platform and this time try the Wanhao print bed level check.
Nope still not sticking in places.
Ok,ok enough. Switching the machine off the build platform was brought to the front. All of the PLA cleaned off and the platform washed off with soapy water.
Now it should be alright.
Switch it back on, auto zero the printer and try the calibration again.
Still failing to adhere to the platform.
Clean it off.
Switch it off.
Readjust the front bed levelling screws.
Try again.
This time the extruder motor sat there and clicked, skipping filament!!!! brilliant.
I don’t need to clean it off this time as there is no filament!!!!!
A blockage, just what I need.
Before it cools eject the filament. Excellent it snaps above the height of the ptfe tube.
Switch it off.
So after a cup of tea.
Switch the printer back on, navigate to preheat PLA, and use a pair of pliers to try to remove the filament. You have got to be kidding me. It snaps again slightly lower.
Switch it off.
Ok, nothing left it now needs stripping.
Switch it on and navigate to preheat PLA again, wait for it to get hot and wipe off the excess PLA from the nozzle with a paper towel.
Using a spanner and mole grips, to hold the heated block, the nozzle comes loose and is removed.
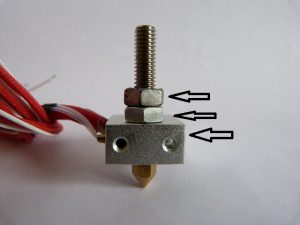

Switch the unit off, I noticed that the lower x axis rod was getting hot. That’s not right. So looking at how the hot end is put together I see that I have a thermal bridge between the two nuts on the threaded rod. As there is no gap between the nuts the heat from the hot end is able to travel up to the mount and from here to the bearing and onto the rod.
This is what caused the filament to melt inside the extruder. The cause of the failure.
I will need to remember that when I put it back together.
The stainless threaded tube with the ptfe guide in is supposed to be the thermal break for the hot end! Oops. I’m learning.
Removing the threaded tube by unlocking the nut and removing the retaining screw. I use the mole grips again to hold the hot end while doing the two nuts up together. This allows me to use the lower nut to unscrew the threaded tube. And yes it is blocked with filament.
Using an allen key to push the ptfe guide out of the bottom of the tube I could see that the heat had melted the filament past the end of the ptfe and had jammed it within the threaded tube. It was going nowhere fast!!
With the fact that ptfe is so slippery the filament slid out with little trouble. But yes it had melted above the top of the ptfe tube.
Right now to reassemble it.
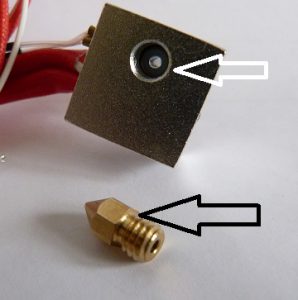

Put the ptfe back into the threaded tube.
Clean the seat of the nozzle, clean off the plastic on the heated block. Both of these surfaces need to be clean or the plastic will start to ooze out when heated.
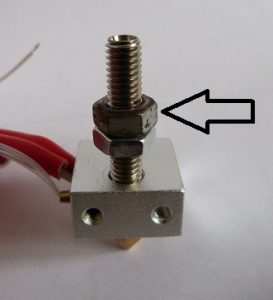

Once the nozzle is fitted into the block and tightened, not too tight but enough not to come loose when heated. The threaded tube is now screwed down until it meets the nozzle. If there is a gap left between the nozzle and the tube it will allow the filament to bulge and cause a blockage, requiring stripping of the hot end again very soon.
Use the same technique of locking the two nuts together to force the threaded tube onto the nozzle. Unlock the nuts using two spanners and use the lower to keep the tube in place up against the heating block.
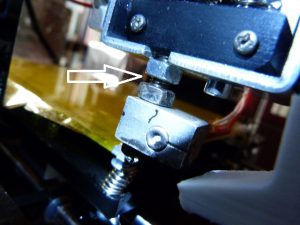

Now to ensure that there is at least 3mm between the nuts. Set the second nut at approx 3mm away from the nut locked against the heating block. Screw the lower extruder motor mount onto the threaded tube.
Only screw it on far enough to allow the lower mount to be placed into the motor bracket.
Screw in the retaining screw and then lock the upper nut up against the motor mount. As the nozzle is lower I will need to adjust the bed to compensate.
Screw the motor back on and refit the tension spring.
Ok so that is back together.
Before you insert the filament we need to carry out the adjustment of the bed.
What I found was that the x axis end stop screws had come loose, so the x end stop was a bit variable. This was re-tightened.
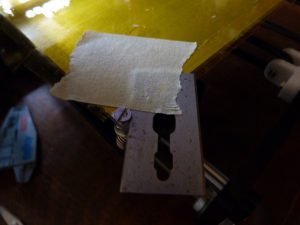

As the ‘home’ position for this printer is off the build platform you don’t know whether the z axis is correct. So what I did was to get a piece of paper and cut a 2 in (50mm) square. Tape the corner of this to the build platform with the other corner extending under the print nozzle – I ended up using a razor blade, just be very careful if you do this not to cut yourself. I found that the paper was not rigid enough, so thin card would be better.
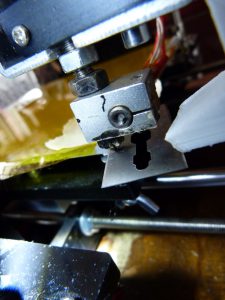

Using the move axis menu routine you can now adjust your z axis end stop until you are very close but above the build platform. What I had noticed was the adjustment screws for the build platform were almost down to their minimum. I set the z axis end stop to approx 1mm (0.025in) above the blade.
I think the reason this had happened was that the z axis end stop had become loose. Note to self – if you need to adjust the printer a lot then stop and see what is loose!!
I now moved the print head over the build platform and performed the paper calibration to get somewhere close to the right height. This was performed in all of the corners. Now there is adjustment on the springs.
Going back to the ‘home’ position I then trimmed the end of the filament, with the slipping earlier the gear wheel feed had marked the filament. Shaping it with cutters slightly will ease insertion.
Navigate to the preheat PLA menu and wait for the temperature to be reached, go to the move axis menu and navigate to the extruder axis, move the filament at least 6mm (1/4in) to ensure that there is no blockage within the nozzle and the filament is coming out straight.
All ok so far.
The fan starts when I select preheat PLA and there is no way of switching it off, so switch off the mains and back on to reset.
Navigate to print from sd and select the calibration.
Watch in anticipation while the printer heats up again and starts to move the print head towards the build platform.
This time there is a thin line of filament laid down onto the build platform. It is not really stuck to the build platform so the front two platform adjusters are turned half a turn.
The print continues and reaches the end.
The platform is cleaned off.
And try again.
This time the filament is pressed down onto the build platform and produces the square with a cross perfectly.
A smile forms across my face, the printer is back in action.
The calibration print is removed from the build platform.
It is wiped down.
You navigate to the print from sd card and select the model you were trying to print over 3 hours ago.
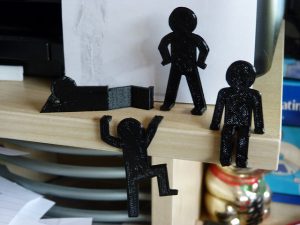

This time it prints perfectly.
The morale is that if you have to keep adjusting things or if prints keep failing there is something wrong – it is not just in a bad mood with you.
Look after your printer and it will cause you less hassle when you really need it. The same as anything in life really.
I hope after reading this you will spend a few minutes looking over your 3d printer and check all is well.
What have you come across that you should have done but put it down to your printer being temperamental? Share your stories in the comments box below – or if it is a long one get in contact it might make a post!
Thanks for reading
Phil
oh and another thing – if you happen to melt the air duct on your extruder you might find that your print stops part way through.
My extruder stopped working for – to me – no reason.
So I stopped the print and went to the extruder move axis menu. The temperature was correct and still it did not extrude.
So I switched off and on – could have got a job in the royal navy – going back to the print from sd I tried again.
It failed again, this time though I glanced at the temperature of the extruder – it had dropped from 210C to 180C and the filament was not coming out. I removed the duct and the temperature rose and the filament started to come out again.
Fitting the duct in backwards helped with the temperature, I will need to print off another duct and will probably go for one which surrounds the nozzle and points down rather than one which just emits air from one direction.
The reason for the stopping of the filament – the air flow was cooling the heater block too much and the cartridge heater could not keep up. The print didn’t stop, just the filament! I thought I had another blockage but it was just the air flow!! so another 3d print failure averted.
