
by pampasnet May 07, 2019
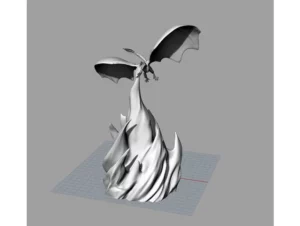
I know the excitement you feel when you get your 3d printer. That ‘ I want to print the fire dragon and it will be perfect’ thought….
I don’t want to put a dampener on it, but if you don’t get to know your printer you will be putting it in the corner or worse selling it as it ‘doesn’t work’….
So take a little time to get to know your printer and how to go through the 3d printing workflow and this effort will be rewarded with successful prints.
I know that print bed leveling was one of my main problems at the start and spending a little time getting used to doing this will pay dividends as the adhesion for the first layer is critical for holding the model onto the build plate….There in no worse feeling than after waiting 12 hours for the 3d print to finish finding that it is starting to come loose from the bed, you see it wobble and can do nothing about it…
I notice that manufacturers don’t include a calibration print onto the sd included with most printers…they do include models that can take up to 12 hours to print and as a first print that would be demoralizing…Imagine starting the print only to see 1% come up after half an hour or so….no thanks….
So what i would suggest is to go through a few simple models to start with…Maybe not as exciting as the fire breathing dragon, but will help you get to know your printer and how to use the slicer software( a very important part of the workflow)
After leveling the bed most people look to print in the center, i normally find that beds are not flat to the degree that they need to be so tend to move the model to the front left corner…standing in front of the printer, my nozzle sits to the front left in the home position, so i use this fact that if the model is positioned in the closest corner to home it travels least distance to start printing…
And you can level a corner easier than leveling the whole bed…cheating i know, but does mean that you get printing….
So there are three models for download on this page….
The first is just a 50mm circle 0.2mm high…Basic, boring, but useful as a quick print to get that all important first layer adhesion….and one to go back to time after time until you know your printer….and then go back to it with different new materials to make sure you get that all important adhesion correct…
The second is a hollow box with rounded corners…I can’t take credit for this as i grabbed it from my work with KISSlicer and the sublime layers website….
The outline of the box ensures constant acceleration so is looking for problems with the sliced model rather than your printers defects…
The third model is a calibration print to find out what your printer can do, so you work within it’s limitations or improve the performance of your printer…
Why do i supply these from here…People update their designs or websites drop out of fashion or stop, i have had it where a new model to test a certain parameter of the printer was offered from this other site, only to find that it was down and no searching could turn up the model…So i will grab a copy and it will stay here as long as the site is up….( as an instance of this the sublime layers sites links are down)
What’s the aim – to get you to have fun with your printer, knowing that when you slice your model you know that it should print…
But we need to start at the beginning….
With a simple model and change it from a model to something your printer can understand…Your printer is a dumb machine that you need to give it simple instructions like ‘ move to here while extruding plastic’ sounds simple, but is really complicated….
You can, if you really want, create your own files by hand for the model you want to create…You can learn the G-code commands ( this is the language of the printers)…Carefully typing in each line…Making sure you have taken everything into account…
Only to find that you missed one command and the whole thing doesn’t print…and this is ok for very very simple models…but even for a 20mm calibration cube with letters on the X,Y and Z axis you have thousands of lines of code to create…I wouldn’t even dream of doing it…And this is why you use a slicer program…
There are several slicers that turn your model stl or obj files to G-code for your printer…Most will work with most printers – some printers have proprietry code , so make sure this is not required for your printer or strange results may occur…
But to get to the slicer, one of the best known and most used – as it is free and regularly updated – is Ultimaker’s Cura slicer…
I know it from it’s early days before it became the software it is now – to me it was a lot easier to use and learn in that guise and i still creep back to this version to do a very quick print…( early version download – version 15.04.06)
So let’s find out a bit more about this slicing software…
What is cura
Cura software is a slicing program, created by Ultimaker, that converts 3d model files into language that most 3d printers can understand. It converts stl and obj files into G-code, a form of machine language for 3d printers.
So after you have downloaded or created a stl ( stereolithography ) file from cad or elsewhere, you need to produce a file for your printer to understand.
You may have tried printing the example stl files on the SD card with your printer, only to find that it does nothing…
Cura takes the stl file, which is a representation of the model created in a mesh structure of surfaces. Formed of many triangles and the number of triangles on a surface determine the quality of the final print..and creates a layer or slice, a 2d representation, for each layer of what is needed for the filament, movement and speed.
With the new Cura there are over 600 individual parameters you can setup…do you need to …nope, unless you find that your printer needs a little extra help in certain areas…
There are easy modes to use for cura and this is what we are going to explore first.
But before that you need to install and setup Cura…
Installing Cura
Cura is available for download from the Ultimaker website (https://ultimaker.com/software/ultimaker-cura)
The latest version for me at the time of creating this article is 5.0…
Once downloaded you need to install it…
Click on the downloaded file to start the installation…
You go through the setup, agree with the license and choose the location of where it is installed…
Once finished you can run Cura…
If you have had older versions it will pick up on any configurations you made…
If this is your first install then you need to configure the software to work with your printer.
Initial settings
Once you launch the program then you will get a welcome screen…
Going through these you get to read and agree to the licence agreement, then select a printer, assuming you are not attached via a cable…
As you can see i chose a Geeetech A10T ( triple feed into one nozzle printer), but make sure you select yours or add it as a custom printer and go through the details as close as you can..
.you can change these in the future.
You get to see what’s new and then…….
The home screen….
And this is where it will open to most times from now on…
Initial model
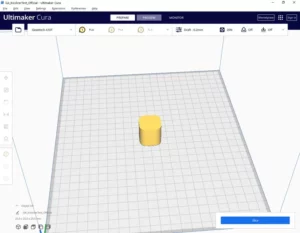
You can now import a model or drag and drop a stl or obj file …maybe try the test box….
Download the testbox now.
It is not very exciting, but it will help you through the workflow…
You should now have a rounded box in the middle of the build plate…
To have a look around click and hold the right mouse button and you rotate the view.
If you want to move it across the screen press shift + right mouse button
And those are the basics of moving…
You do have views in the lower left corner to quickly take you to the home view, front, top, left and right….
It is worth clicking on your printer model and just checking that they have got the right settings…
So click on your printer name and manage settings….then machine settings…
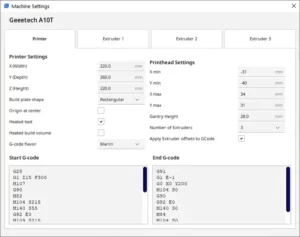
Check that the bed size is correct as well as the print height…
Mine didn’t have the heated bed ticked , so i went ahead and altered that…
And you see in the lower panels the start of your file of g-code…
Mine starts with
G28
G1 Z15 F300 …etc
This is the code the printer understands…
You may like to decipher what is going to happen at the start of the printing.
But G28 it the command to ‘home’ the printer
G1 is a move command
Z15 is move the z axis up 15 mm
F300 is at a rate of 300mm/s
If all of this is baffling you don’t need to worry too much as the software will sort it all out…
This bit you see here is placed at the top of the file and will turn on the heaters for the bed ( if applicable) and nozzle…
Home the printer, so it knows where it is…
And in my printers case do a purge line at a nozzle temperature of 215C along the front of the bed…
With this in mind you need to be aware of what it is going to do as placing the model close to the front of the bed will cause it to draw over this line and maybe pick it up and prevent the model from printing correctly….
Ok so close the printer settings after you are happy with them.
For orientation on the print bed the corner with the three axis is the front left as you look at your printer from in front…or the place where the nozzle goes home.
And now click on the model.
You should see the three axis colors come up…
Click and dragging on any of the three ( ideally you don’t want to move it off the bed) so maybe two axis and move it towards the front corner…bearing in mind the fact that mine will print a line approx 10 mm in along the front edge…
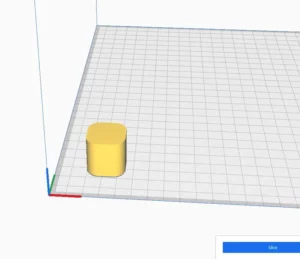
Each of the squares on the bed represents 10mm to give you a gauge of size of model and where it is positioned.
Mine ended up around 20mm in from both edges…
Ok so now we want to know how it is going to print it…
Basic 3d printer settings
Phew …who knew that this was going to be this involved…
It is worth going through the process a few times and taking it all in rather than rushing to get something printed and it failing…
If we now click at the other end of the bar where it is displaying your printers name a drop down box appears…
You have quick print quality settings for extra fine, fine, normal ,fast etc and you can see the layer height it will slice it at…
Clicking on draft will automatically set all the parameters to what Ultimaker think they should be and is a start to see how your printer deals with them…remembering these settings have been optmized for the ultimaker printer series, but they will take your printer into account…
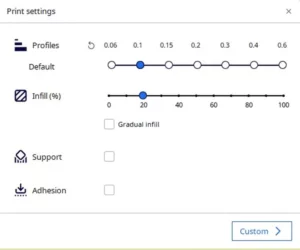
If you click on the recommended box you will see an overview of what will happen.
You will get a layer slice of 0.2mm and 20% infill…
The infill means that any inner space defined by the model will be filled with printed hatching at a rate of 20%…so saving plastic and time…
If you went with 100% then it may cause more problems than solving them…
If you think that you are dealing with molten plastic and wanted 100% infill you will need to allow the plastic time to cool before you add the next layer or there will be problems…as it is the model will probably warp or have sinks in it as the material cools…
So can you go the other way and have zero infill…
You can when you design for a hollow body, but if you are creating a top then you will be printing in free space, and unless your printer is good at bridging the top lid will be drooping and not very well printed….
20% is a sort of rule of thumb compromise between using some plastic and being able to print a top smoothly and having enough strength in the sidewalls for you to handle it without thinking it is delicate…
Now we press the slice button down the bottom…
Viewing the sliced model
Once slicing is complete you will see the approximate time it takes to print the model.
If you go back and select a different quality and slice again you will see the time increase as you go for a finer model and reduce as you go for a thicker slice.
But as you go upwards beyond 75% of the size of your nozzle ( typically 0.4mm) you should get an error, but Cura on the basic settings does not do this.
If you set it to 0.6mm and click on custom settings then open the quality accordion you will see that the layer thickness has gone yellow – meaning there is an issue…
If you drop the layer height down to 0.3 then this goes back to white…
You can typically go for a maximum layer height of 75% of your nozzle diameter…
You may be able to get away with more than this if your extruder can push the material out, but i would stick with the 75% rule for now…
After any changes you need to click the slice button again to reslice for the changes…
So mine will take 27 minutes and use 6g or just over 2m of filament…
If you click on preview you get to see the layers and can drop them down to the first layer and then also roll back through the print path for each layer….
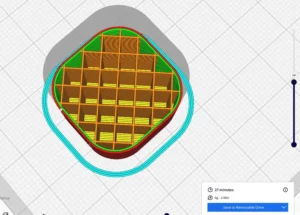
You will see that there are 4 layers on the bottom before it gets into infill pattern ( you can try different types once you are more confident), this is a hatched pattern….
Once you get used to this stage you can start to explore more of the settings, slowly at the start…
But if you do go this route, try to change only one thing and then reslice and look at the model to see the differences…
Have i got enough filament to print the model
This is a question a lot of people have…
When you first buy a printer typically they throw in a bit of filament, normally around 10m.
So in this case, yes and you can print 5 of them…
Or in the case of a 1kg reel, depending on the material weight you get an average of 335 meters…so you can print plenty of these…
How do i get my printer going
Ok so we have sliced the model on the computer, but that has not passed the file onto the printer…
There are two main ways of getting the file over to your printer…
One is via a usb cable…
But i wouldn’t advise this as it has issues…
The computer going to sleep as the printer is so slow…or the computer needing to be awake for a very long time while it is printing…the other problem i have heard of is windows updates….when these happen your printing stops….
And the printer can get overloaded ( remember what i said about it being a simple machine.. it has limited capacity as well…), if too many commands are sent then it overloads the memory.
This can cause strange actions for the printer…
Or the one i use which is to transfer the file onto the supplied sd card ( or a better one) and put that into the printer and go through the menu selecting the print from sd and clicking on the right model…
My print didn’t stick to the bed
If you have got this far you either have a good print ( congratulations)
Or something that resembled the model…
Or the print became detached ( build plate adhesion issues) from the bed….
If the latter is the case then go back and level the bed again, maybe even try my newer method with the FSR ( force sensing resistor)…
And only allow the printer to print the base or select the test circle model( ideal for checking the bed leveling)…
But let me know how you get on and whether i have missed anything major in this tutorial…
I will be going through other slicers and setting those up to work with the same printer and compare the prints.
But if you have got this far congratulations…and i hope you have a successful print…
Now try it a few more times from scratch so you get used to the workflow….
I will create a checklist for when you get a bit more advanced of what to check in the settings…
Thanks for reading…