
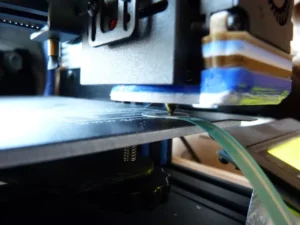
You have bought a 3d printer…brilliant…
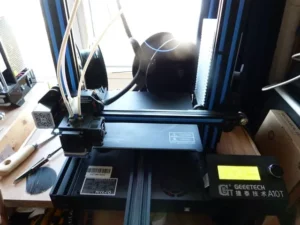
It’s a kit, so you put it together carefully…
You want it to be perfect…
Ok…so all built….
Now testing the various parts…
Plug it in, switch it on with eyes closed….
No bang …phew!….
Navigate to the motion menu…
Go through all the end stops, all ok
Stepper motor movement …all ok
Z end stop leaves the nozzle above the bed…good….
Auto home…
Yep we are getting there…
Now to calibrate it….
Leveling the print bed….
Out with the spirit level and adust all four to make it perfectly level……woah…wait a minute…
Nope…nope…nope…that’s not what it means…..
Lets’ explore this a bit more….
What is leveling the bed
What are you trying to achieve with bed leveling on a 3d printer….
You are after the nozzle staying the same distance away from the printer bed all over…
This will make the nozzle be at the right height above the bed over all the surface, helping with bed adhesion…
And you have adjustments at each corner to do it with…along with a z end stop…
Not much to go wrong…easy peasy….
The bed is usually made of aluminium which is stamped out or die cut…
This process will usually bend the plate, in normal circumstances it won’t matter if it is out by less than a mm, but in our case it’s different…
The other thing you will get is a slight raising of the edges, all part of the process…
Now you can get a steel ruler 300mm long and place it across your bed and see how much it is out….
This is a lot easier if you do it with the bed off the printer….
But we can find out what it is like and whether we can use the whole bed or not…
Ok… so you now know that you are after the nozzle being the same distance away from the print bed all over, or what is termed leveling the bed…
It’s not about it being perfectly level as the rest of the printer will not be level…
First attempts at leveling
I do remember the first few times i had a go at leveling the bed and walking away in frustration….
I ended up leveling the front corner just to get it printing….
To see what it can do and does it work….
That is one way of getting up and running quickly….
Then you forget to move the model to the front corner and try printing in free space in the center….oh cr*p…..
You might as well get it leveled now….
Setting the initial height
As i said above you have the four corner leveling knobs which adjust the height of the print bed and you have the z end stop, which sets how far down the nozzle comes before it stops…
So it is now a bit of a juggling act between the spring pressure and the height of the end stop…
Ideally you should be looking for about half of the spring travel compressed, this is so that there is not too much pressure on the lower plate…
Too much pressure on the lower plate can warp that and cause issues…believe me i know all about that…watch out for lower plates made of acrylic or wood, but even the metal ones are not immune….
So with the nearest corner bed adjuster, find where the minimum adjustment it ( plate highest) to just have the spring compressed….
Then rotate it 15 turns….this will move it down around 7mm ( with the pitch of a m2.5mm screw being 0.45mm, 1 turn of the adjuster will move the bed by 0.45mm)…
Ideally you will now adjust the z end stop so that the nozzle just touches the bed when triggered….no mean feat if you can do it…
I tend to get it pretty close and readjust the bed adjuster…
But how do you know when it is just touching the bed …or even close to the bed…
There is a method that most will teach you…and this is the paper method
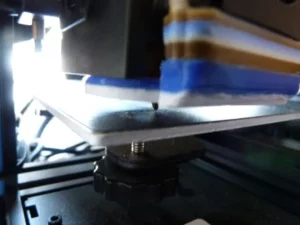
Paper clearance method
Take a piece of paper and slide it under the nozzle….
Bring the nozzle down towards the bed slowly…
Keep moving the paper back and forwards until you see the paper bunch up…
This means that you are a papers width above the bed….
If the z height is above zero then you need to lower the bed by adjusting the leveling screw and that goes anticlockwise looking down from the top….
Or if you can’t get the paper trapped between the nozzle and the bed then you need to lower the z end stop to get it in range…
If there is a large movement needed, then i will lower the bed down again by 1/4 turn anti clockwise…
The reason for this is that if the other 3 corners need a large movement then it may raise the first corner causing a collision…not ideal…
So now go to the other front corner…i usually do the fronts first…
Then the rear right and the rear left…
Coming back to the front left…
It is very likely you will need to readjust this one….
And go around the other three again….
Well i did this for a number of years and the drag on the paper sort of worked to get the gap the same over the four corners…
but i always thought there has to be a better method…
An updated leveling method
I can’t take full credit for this as i have seen others saying the same method….
But if you want a method that gives you accuracy for leveling the four corners to within 0.01mm then this is for you…
And it is repeatable…and that is important….
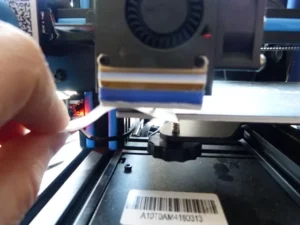
I found that there are force sensing resistors which are 0.2-0.5mm thick
And applying a force to the top causes a change in resistance to the mid layer….
And the distance moved to change in resistance is typically less than 0.01mm, but i can’t quantify that at the moment…
I bought one of these fsr’s off amazon and once it arrived proceeded to use a multimeter to check the resistance…
With no load on there it read infinite ohms or open circuit….
But squeeze it with my fingers and the resistance came tumbling down….showing 0r or short circuit…
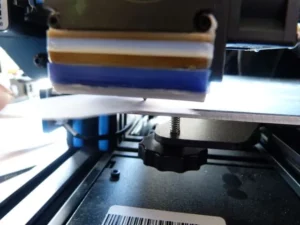
Ok, so placing the sensing area between the nozzle and the bed, i adjusted it so that it went to 0r, just…
Then proceeded to do all the other corners….

And went around again….and readjusted…..
Now using repetier host as a remote control for your printer i found it has a control for 0.01mm in the z axis, whereas pronterface ( my usual goto has a z resolution of 0.1mm)
And i can level the four corners of the bed to withn 0.1mm using the fsr, and quickly…
None of the does it feel right, it is just an on/off switch with the thickness of 0.5 mm…
I know this is
too much for most printers as they come with a 0.4 mm nozzle, so the max should be 0.3mm…
But knowing that 1 turn of the adjuster is 0.45mm…you can turn it clockwise looking down on it by 1/4 turn to move it 0.1(ish) mm and turn the other 3 the same amount…
Yeah i know some will say that this is not accurate….
But it is still more accurate than using the piece of paper technique…
The other place you can now check is the middle of your bed….
You will probably find that it is lower than the corners….
There are two ways around this …
One is to take the bed off the printer and try to apply pressure to the middle ( without damaging the thermister that is sensing the beds temperature)…
Or the other is to raise the corners to compensate and have less gap…
For 3d printing it is always better to err on the side of too small a gap rather than too large…
Too small means the first layer will not be as thick but at least it has a chance of going down…
Whereas too large a gap the filament probably will not stick to the bed….
I have developed an arduino program to take the sensor in and switch an led when the resistance goes low….
I will upload this very soon…
But what about auto leveling, doesn’t that do this for you….
Auto leveling
Automatic bed leveling on the 3d printer can be a bit hit and miss….
You can go into most of the forums and read posts about members using auto leveling and the nozzle being above the bed printing in free space…when not set up correctly…
So it is really a matter of setting up and with the auto leveling when you change the nozzle you will need to go through the offset height again…
If you change the nozzle you will need to go through manually leveling again as well, this is a certainty as you will have changed the height between the nozzle and the bed…
It does work and can help when your bed is not totally level, but i would not rely on it to get an out of level bed level, i have just seen too many printers which are trying to compensate for bed offset and not doing a very good job….
Which method is best
I would have to say a combination of the two…
First get the bed level with the fsr and then go on to setup the auto level, if it doesn’t interfere too much with the time of the print…
The auto level routines i have seen are pretty slow.
But i will have to get my bltouch added to my printer again to try it….
But as a beginner i would definitely get my hands on one of these fsr levelers to take the vagueness out of when the gap is the same…
Then adjust the bed up a touch to get the gap right…
You may still need to adjust it on the first print you do, but it will only be a touch…
Let me know what you think and whether you will try the fsr leveler….
And whether you are interested in the arduino unit for showing the fsr operation…
I am also looking at using two of the accelerometers to see if setting the jerk and acceleration levels can be set in this manner to get better prints….
This will be for a future post….