
Which Free 3d Printing Modeling Software is Right for You?
Once you have owned a 3d printer for a few months and got to know it. Downloading the latest part off Thingiverse or youmagine gets limiting, you want to explore what you can do with your printer.
So you start think ‘what 3d printing modeling software is out there for free?’
Well this article shows you some of the packages which are avaliable for free.
Take the poll at the bottom to show the popularity of your cad system.
There are paid ones, like solidworks or rhino which cost thousands, There was one which only cost tens of dollars, cubify invent– I found this one just as I was starting to get into designing – and didn’t buy it – a week later I couldn’t buy it, the manufacturer had discontinued the low end version and continued with the high end costly version.
What I have found with cad is that if you ‘click’ with how it works, you like it – if you struggle with the core concept then you will struggle to create models with it.
So work on understanding how the cad system works in the first place – check whether there are any training modules or a community and take it from there.
So which ones will we take a quick look at?
From my engineering background, designspark mechanical is the first one I would go for, autodesk fusion 360 ( or 123d as it used to be known), openscad, sketchup, autodesk tinkercad and blender.
There are plenty more but these are the main ones used currently – I am sure that others will come and take their place.
So let’s have a look at the cad systems
Designspark Mechanical
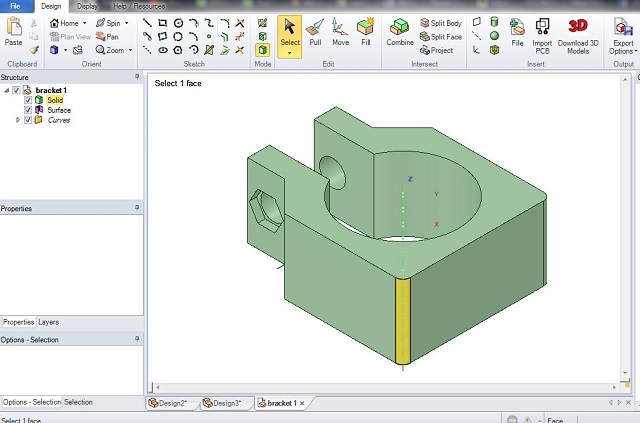
Designspark mechanical was developed as an addon to the already going designspark pcb, the mechanical addition gave the designer the capability to add their circuit board to a mechanical package.
The mechanical cad system is a simple and uncluttered interface.
There is more than enough capability for the majority of cad designs most of us will do and the fact that it is a simple export to get the stl file out of the cad is an added benefit.
Installing the software is simple, but only 32bit and 64 bit versions for windows are available.
You will ned to be connected online every 30 days for the software to check your license. But between times you can happily use it offline.
There are a few ads present when you start the software, but it is free. This screen is easily closed by clicking on the ‘x’ at the bottom of the panel.
Starting a new design from file –> new design – and you are presented with an orthographic screen.
If you are online then the quick guide on the right is active, worth a browse at the start to get the hang of it.
The orient button along the top menu ( a box symbol – click the drop arrow) allows you to choose which view you want.
If you select top view you get the x and y standard drawing screen.
For me the scroll is backwards from intuitive, scrolling forwards makes it smaller and backwards makes it bigger. For most of the other cad I have used it is the other way round.
The standard sketch tools are next to the orient block, these include all of the 2d drawing tools, line, rectangle, circle.
To make your item 3d then you have to use the pull command -this pulls the object in the direction the mouse pulls it.
The combinational tools are located to the right of this group allowing you to merge or intersect the objects.
You are able to utilise the vast library which is the mechanical parts within RS componients – if you know you want a box, then simply pick a box of almost the right size and alter it to fit. Pick a connector and place it into the box where you want it and combine it to form the cutout of the right size. So there are no excuses for getting the size of connectors wrong.
There is a fair amount of help from the distributor, creators and user community.
This cad is more for the mechanical rather than sculpting. It is a little limited and clunky feeling but with it’s easy to use clean interface you should have no trouble picking it up.
Autodesk Fusion 360

Autodesk fusion 360 is a full 3d cad system, at the time of writing, is freely available for schools, hobbyists and small businesses.
There is more than enough capability within this cad system to create whatever you want.
The user interface is clean, with most of its capability tucked away behind a top level menu.
Each top level menu has many functions behind it. Opening the create menu will allow access to a multitude of shapes, including cylinder, box, thread and sweep.
I had difficulty with the display at the start and had to change to the older direct x 9 driver – requiring a restart. i blame my old computer.
You will have to sign in, but you do not have to be online all of the time. Every two to three weeks it will need to validate the license.
Changing the view is easy and clicking on any of the surfaces of the box shown in the upper right hand corner will take you to that view. You can also rotate and pan the view by using the controls at the bottom center of the screen.
Multipart designs can be easliy assembled, with parts being able to be turned on and off.
If you want to work on a design with others then the 9 square menu icon in the top left corner will allow you to merge with others to see the latest design. This is a feature not seen on most low cost or free cad systems.
You can save your project as an stl file for the 3d printer or you can post process the design by sending it to one of autodesks other pieces of software meshmixer.
There is plenty of online help files and videos to show you how to create almost anything.
Openscad
Openscad is a bit of a depature from the usual cad system. This user interface is based on describing the model.
You specify your model in terms of text – so ‘cube ( size = 10,10,10); ‘ will draw a cube 10 x 10 x 10 on the origin.
You preview what you have described by clicking a button and if you are more used to programming that visually dragging and dropping this may be a choice for you.
Is it easy to learn? You really need to read some of the help file before you start to know what commands do what.
There are a small range of native shapes you can employ so a bit of practice and you should become conversant with those.
If you want to move it anywhere other than the origin you can use the translate function, or rotate function in front of the definition of the cube.
So translate ([10,10,10]) cube(size = [10,10,10]); puts a cube away from the origin.
It may seem very much like programming but is quite easy to learn.
You can build up a library of parts and combine them with boolean expressions.
The scripts can get very large, but you can always subdivide things down.
It is very easy to go into the script and alter values to change the size or placement of items.
But if you struggle with being able to visualise items in their basic shapes this may not be the cad system for you.
Sketchup
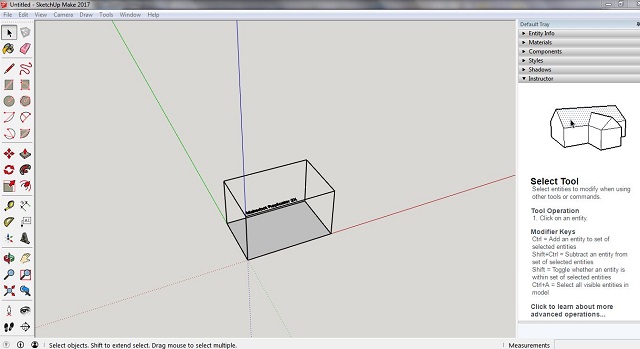
Sketchup, now owned by Trimble was owned by Google.
It is in two versions, a free one sketchup make and a pro version, which costs $695 (in 2018). At the time of writing I can see that sketchup free will be going cloud based, there is sketchup for web – where you work in a browser rather than offline and have to login to use the software.
The free version is lmiited in functionality, but is adequate for a lot of modelling, so if you get on with it then use it.
On the site where you download it , there are a lot of tutorials to get you started.
Once downloaded and installed, starting sketchup you will be asked to add licence. If you ignore this and click on the template tab and scroll down to the bottom there are two templates for 3d printing, you can choose between inches and millimeters. Or you can just use the standard template, the advantage with using the 3d printer template is that you can see whether the model will fit within your printer, but if you are making a multi part model this will be overruled. You can always delete the printer box from the design space.
With sketchup you cannot import a stl to edit it and saving for the 3d printer will be exporting an obj file, without an addon.
Down the right hand side on the screen is an instructor, showing you how to use the tool selected.
As with most cad programs, some procedures are easy and others hard, if you don’t know how to model them.
Very soon after starting skethup you will find the mini toolbar a pain, to get an expanded toobar go to view -> toolbars… and untick the basic and tick the large tool set.
Why is there a free version and a pro version, well after 30 days your functionality will be limited and they want you to upgrade. It maybe worth investigating the online version.
Exporting to stl is possible with an extension. To add an extension goto window → extension manager.
Once the window comes up then at the top type stl.
Select sketchup stl and install it.
This will add the functionality to import and export stl files.
Importing the stl , it will come in as a group and need to be exploded to modify.
So if you want to create simple model easily then sketchup may be worth trying.
Watch how easy- once you are used to it you can make a table
Autodesk Tinkercad
An awful lot of people are using tinkercad online cad program.
Once you get started withit you will see why.
Sign up and get through the new gdpr screens (what a pain) and you are offered training to get used to the system.
It is worth going through this to see how the system works.
Once you have had enough of that then going back to the home screen and clicking on start new design will take you to the design area.
It has a slightly weird view – when clicking on the front face of the view cube – you are left looking slightly up rather than directly onto – clicking the orthographic view ( button down at the bottom on the left ) takes you to the standard front view.
The basic shapes are as easy as building blocks to add and manipulate.
Don’t forget to look closely at cylinders for the number of sides or your print will not end up smooth. I would increase the number of surfaces after you have finished the model as a large number of surfaces will slow down your model.
Once you get used to the interface then I can see that it is a very easy to use 3d cad system.
If you haven’t already got a 3d printer but want to design and print it, then this cad system allows you to send your design to a number of maker places where you can have it made.
You can download the stl for your printer or post your latest creation on social media.
Would I use this – for a quick way to get a basic model and, I am sure if I stuck with it, I would find it is capable of a lot more than I think, but I prefer an offline cad system.
Blender
hmm… I wonder which side you will come down on with Blender? Maybe you have already tried it and are ready to pass this section by or you are waiting for my thoughts.
When you start blender you are shown a screen with a cube on it. A load of buttons a few tabs and …
Help… please…
The controls are not intuitive as has been in most of the above cad systems. The left mouse button in most cad systems will select things, not so in blender, this sets the 3d center position.
Moving objects selected usually is click and drag then drop when released. Do this in blender and you are still moving the object when you move the mouse – you need to right click to select and then left click to release.
And keyboard shortcuts or key shortcuts as they are known in the help file, there are hundreds – you won’t need to know most of them unless you are getting into making animations, but getting to some of the functions can be tricky using the menu structure.
With a relaxed mind and a willingness to learn you will be presented with a cad system which will far outperform any model you want to make. You will be constrained more by what your 3d printer can print.
Using the full capabilities of blender you will be not only creating a static model but animating it and creating a short movie, but maybe this is the way you will be advertising your hard work in the future.
Blender has a thriving online community, I know this is very important when learning something new like this, along with plenty of online tutorials, manuals and practical advice.
After installation, running Blender you will be presented with a cube on the screen, with 5 settable areas.
Clicking at the top left of each of the areas allows you to choose what information is shown in each area.
You probably won’t need the timeline or the plalyback ( the two at the bottom), so you can left click on the little hatched area just under the selection and drag it to the bottom of the screen.
If you want to put them back you can left click and drag it back.
Have a play at adding primitives to the screen and you will see the difference between this system and the other cad programs.
Move the primitives around – on axis by left clicking the axis you want to move on or right clicking and moving freely – don’t forget to left click to drop it after you place it in position.
One important addon for 3d printing is the 3d print toolbox.
You can add this via the file → user preferance menu
select addon tab.
Scroll the addons down and click on mesh- then tick the 3d print toolbox item.
This will allow the model to be checked for errors before passing the file onto your slicer.
You can save a stl file from this cad package.
After moving the areas around why not save it as your default config.
Press ‘a’ after clicking in the main screen to deselect everything then press ‘a’ again to now select everything.
Pressing delete will remove all of the objects from the drawing area after clicking on the confirmation box that appears.
Click view → left and you will have a screen that looks more like a standard cad package.
Click file → save startup file and this will then be what you see on starting blender.
Is it a powerful cad package – yes.
Is the user interface friendly – no.
Will I use it a lot – possibly, depending on how much time I can spend with it.
It looks like an extremely good package, with a lot of features that will make very good models. Even though I am more used to engineering cad it may have it’s place and time to allow for artistic license.
Which Operating systems will they run on?
I know there are loads of other packages around now – even for free – the likes of freecad, microsoft 3d builder, brl cad, sculptris – there would not be a person out there who would trawl through all of them – so I have chosen what I see as the top ones at the moment.
So a quick run down of what operating systems the packages will run on.
| Program | Designspark Mechanical | Fusion 360 | Openscad | Sketchup | Tinkercad | Blender |
| Windows | ✓ | ✓ | ✓ | ✓ | ✓ | ✓ |
| Mac | X | ✓ | ✓ | ✓ | ✓ | ✓ |
| Unix | X | X | ✓ | X | ✓ | ✓ |
I hope you have enjoyed my brief look at the cad systems and will have a go at one or more of them. As I say choosing a cad system is personal and you need to really enjoy the way the package works or you will be struggling to create even the basic models.
Approach each cad system with a curious mind, asking how can I model this – watch a few training videos, which will teach you the basics and some techniques you may use in the future. But the main thing is to enjoy your time designing your model. The cad system should become a tool to be used to create your model.
Don’t forget to watch the training from the other cad programs – you may pick up a tip or two- I know I have!!
So let me know in the comments which 3d printing modeling software you have chosen or tried and whether you stuck with it.
Thanks for reading
Phil