
This bowden extruder mod can be carried out to any extruder which it is difficult to insert the filament into…
It just happens that i have a Geeetech a10T – so i have three to do…lucky me…
Why the mod- well…when trying to insert the filament at the rear of the printer it never was able to feed in easily…
It jammed at the feed gear or went into the extruder housing, or never went in at all as i gave up…
It nearly went out of the window a few times…and it is parked right
next to it…so it was very tempting…
So i had to do something about it…
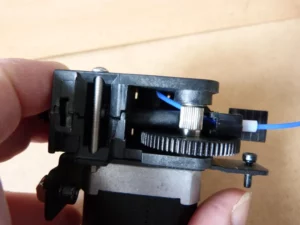
Standard geeetech extruder setup
With the Geeetech A10T you get three bowden extruders that all feed into a single mixing head…
I think it is great that you can color mix three colors in one nozzle…no setting up the heights of three nozzles.. just plug and play…when you could get the filament in there…
When trying to insert the filament i usually ended up removing the extruder from the top rail and then trying to insert the filament before replacing it and securing it to the top rail…not a good solution….
And with older filament that snapped when you looked at it sideways then you start to think it is not the right printer for you…
The extruder is a gear driven one with a tension sprung arm to hold the filament against the gear…
This feeds into a ptfe tube approx 16 inches (400mm) long…
The ptfe tubing is inserted into the mixing nozzle with a heater element and thermister…
There is a single heater in the hot end…
The mod to the extruder
Ok so the filament goes into the ptfe tubing at the rear of the extruder and then cannot reliably feed onto the pressure wheel or between that and the drive gear and feed into the exit tubing…
I knew in the near future i wanted to print with tpu, and having heard that this is a difficult operation with a bowden extruder- then having one that the filament wanted to be loaded was really necessary for the flexible filament…
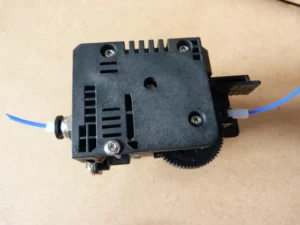
So one of the extruders was removed…
There are four screws holding down a top plate…
A ptfe feed tube and an exit tube….
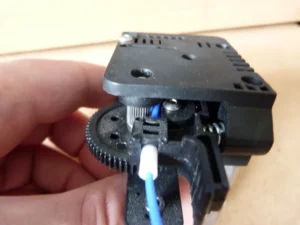
You can see the drive gear and the tension pulley…
Even feeding the filament in this manner i found it really difficult to get it into the right position to feed easily through the extruder..
So the first stop was the tension screw…
On the side of the extruder is an allen key screw which adjusts the tension on the filament if it slips…
So removing as much tension from this is advisable before removing the top….
Screwing the allen screw anti clockwise you can feel the tension on the arm increasing, so clockwise it is…until it stops…
There is still tension on there but it is less…
Need to make sure that it doesn’t go flying across the room when disassembling the extruder…
So remove the top four screws – on one of the extruders the one screw that is not inserted into the motor is longer than the rest…on all the others all of the screws are the same length…
Removal of the top proved a little difficult…
The way i approached it was to use a small flat screwdriver and inserted it just above the metal drive gear for the filament..
There is a bearing on this shaft…so a little wiggling was needed to move the bearing up slightly..
Then using the screwdriver as a level and also lifting the other side ( to keep it sort of parallel) the op is carefully lifted off…
You can then see the tension spring for the arm and are able to release it …
I found the easiest way was to lift the head of the screw up out of the recess …watching that it didn’t fly across the room…i found there was not that much tension on there so it just layed there…
At this point i tried to insert the filament and saw that after the short ptfe tubing stopped it would curl and miss the gear or be able to feed around the tension wheel and into the body of the extruder…no wonder i had problems…
So now what to do…
My first thought was to do what i did with my anet a8 to get it to print with tpu…and that is to extend the input tubing until there is no gap between the gear…so the only place the filament can go is in the right place…
Extruder strip down
The tension arm is removed – on mine there is a top and bottom bearing…
The top bearing may come out..and this makes it easier to remove the arm…
Once the arm is out the input tube can be removed…it can be difficult as it is slippery stuff…
With the a10t you get replacement bowden tubes ( thank you Geeetech)
So i had enough tubing to do the mod to see if it worked…
The A10T extruder mod
I cut enough tubing to fit between the center of the wheel on the tension arm and have the same amount on the outside..this turned out to be 25mm…
To fit the tubing i had to run a drill down the tension arm…make sure it is the right size for the outside of the tubing, so a 4mm drill…
Drill by hand as you don’t want to hit the tension gear with a spinning drill bit and damage it…
If necessary hold the bit in a pair of molegrips ( vicegrips) to turn it gently in the tension arm…
I found taking a scalpel and adding a small chamfer on the leading outer edge of the tubing i was inserting helped a lot…
It only needs to be the corner, just to lead the tubing in…
Once inserted up to the tension wheel then you can see what sort of shape you need to cut to make it move forward…
The diameter of my tension wheel is about 10mm, the diameter of the drive gear is 8mm…
Looking at the exit tube there is a slight difference in the cut for both wheels…
I placed the new ptfe tubing , after removal from the tension arm, against the exit tube and tried to match up the cuts with a permanent marker…you can easily wipe it off with tissue paper as ptfe will not permanently mark…
Cutting through the very soft material with a scalpel you can see the different cuts…i made them straight as i didn’t have a curved blade…it would have been nice for geeetech to have produce another molding to fit this side of the extruder, but they didn’t…if they had this post would not be here….
So now remembering which side of the cut fits which wheel, carefully slide it into the tension arm until it fits snugly against the wheel, not forced onto it as this still has to rotate with the filament going through it…so rotate the tension wheel with your finger to make sure it is free…
Now refit the tension arm and if the bearing came off refit that correctly…
Refit the tension spring assembly and you can see how much closer the inlet tubing comes to the two wheels…will this cause a problem…unless there is a build up of ground filament on the geared drive wheel i cannot see a problem occurring…time will tell…
If the exit tube is in the upper half of the molding remove it and fit it into the lower – making sure it stays the right way up…
Now if you feed a piece of filament into the extruder as you normally would you can see it feeds straight onto the tension wheel and into the exit tube, it has no choice…there is no where else for it to go…
Remove the filament and replace the top molding carefully…i found the bearing for the large gear wheel a bit tight…slightly pushing on the side of the gear eased it…
Refit the screws, trying to see which ones had the locking fluid…on the ones i did last the whole screw was sticky…a little generous with the locking fluid…
Tighten them snugly, but not over tight…the spacers and the bearings in the housing determine the distance between, the screws are just to keep everything together…
With the one screw that only goes between the moldings be careful not to overtighten as this can distort the molding and cause issues with feeding the filament…
And you have finished the mod…congratulations…
With this mod i have been able to print with tpu on the bowden extruder…you really do need to slow your printer down, but it is possible…and the filament went in first time…
And swapping filaments is a breeze rather than a fight…
Refitting the extruder
Replace the extruder onto the frame, plug in the electrical connection..
Make sure the bowden tube is fitted all the way into the tube clamp…i tend to put a piece of blue tape around the bowden tube to show how far i need to insert it…the top one is not so bad, but the bottom one where it goes into the hot end can be a nightmare and cause major problems if not fitted correctly…and the need for the hotend to be hot ( 180C – 200C depending on material in the hotend) as you push the bowden tube in to it’s maximum position…
All i can say now is happy printing…
Let me know if you have done this mod and it helped or not as the case may be …or you found an easier way of doing this- other than buying another extruder…
Thanks for reading
phil