Build your own 3d printer kit – part 4 – programming
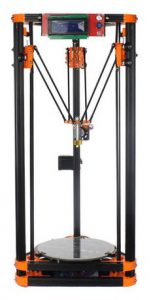
So you want to build your own 3d printer kit, so did I – I bought the Renren3d LE kit.
If you have been following along you will have a built a printer and be waiting for it to work.
Just as a recap.
This series of blogs is my build of the Renren3d LE printer
The series so far consists of
Part 1 – initial setup
Part 2 – frame build
Part 3 – fitting the electronics
And this is part 4 – the programming of the unit
Initial
A lot of people are not happy with this step. Maybe it is fear of the programming part.
But you should treat it like the rest of the build, if you were happy putting the hardware together then think of this as the nuts and bolts of the electronics.
Without a valid program in the controller the printer will not work.
Without valid signals coming from the end stops, the printer will not stop at the zero point.
Without the motor signals going to the right place at the right time the printer will not move.
So what we need to do is to make sure that the right program is fitted within the controller.
To do this we program it.
So here’s how we do it.
Requirements
Before we program the printer we need programs to edit the software and then compile the program.
sounds scary doesn’t it – now I need to be a software programmer!!!
No it’s nothing like that, just follow what is written below and you will be fine.
Notepad++ editor


We will need an editor – one of the best open source editors for text is notepad++
You can get a copy here.
Download and install this program.
Arduino IDE 1.0.6


You will need the Arduino IDE (integrated development environment – that’s why it’s abbreviated!!)
you will need to get hold of version 1.0.6 – only this version will compile this software without errors
Download and install this software.
Printer software
Download the firmware from the renren3d site – mine was named lx_1.zip
Extract this to a directory on your computer. I put mine in c:\renren3d\
So my directory became c:\renren3d\renren3d-marlin\marlin\
Printer control – Pronterface


You will need Pronterface to control your printer. there are other programs but I have found this one to be very stable. Again a free program – you can download it from here
Extract this to a directory on your hard drive – i put mine into c:\pronterface.
You don’t need to install this software and it is a good idea to make a shortcut onto your desktop.
Open a file explorer window and navigate to the pronterface software – mine is in c:\pronterface\printrun-win-slic3r-03feb2015.
You will see a program called pronterface.exe
If you right mouse click on this and make a shortcut.
Drag and drop the shortcut to your desktop and rename it pronterface.
So we have
An editor – notepad++
An IDE – arduino ide
A control program – pronterface
The program – renren3d-marlin
Now lets get this printer moving.
Initial testing
We need to make sure that when we switch on nothing blows up.


Recheck that you have wired the board correctly, just a quick check to make sure motors are not misconnected and the supply is the correct way round.
I know you have already checked it, but it doesn’t hurt to just check it one more time before you switch on for the first time.
I like to have a switched socket for the mains, only so I can switch the unit off quickly. it won’t be quick enough to save anything but I like it.
( one of the upgrades I did in the early days was to install a mains switch and fuse onto the stand I made for the printer. this allows me to switch it off easily.)
Read this first before doing it.
Plug in the printer then unplug it.
Within this time you should see the lcd light up and display some characters, there should be no bangs, smells or fizzs.
if all is well then plug it in again.
This means you have wired it up correctly – well done.
If there is nothing – no lights or anything then check the wiring again- something is wrong.
If the printer now displays the title , along with other information about the printer ten the arduino has been initially programmed.
If the lcd displays hex ( numbers and letters) then it has not been programmed.
Don’t worry both of these are covered by this tutorial
First steps for programming
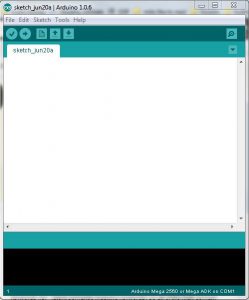

Open up the Arduino IDE, by going to your start menu and navigating down to Arduino. click on Arduino and when it is loaded make sure that the version in the top line says version 1.0.6
Open the marlin software by going clicking on file – open and going to the directory you saved it in, in my case c:\renren3d\renren3d-marlin\marlin\
Scroll down and click on the marlin.ino file and all of the files needed to program the printer will open in a new window.
Plug your printer into the computer, allow it to find it.
Click on the tools menu item
In the drop down list choose board
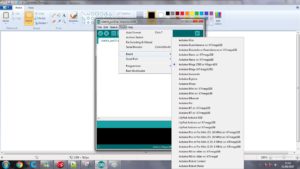

Click on mega2560
Click on tools again and select serial port.
Select the one for your printer – usually the last one.
In the bottom right corner the Arduino IDE should say mega2560 on COMX
Check the software compiles
Click on the verify tick just under the file menu
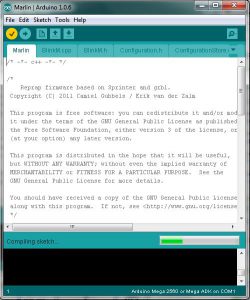

What you see is a green bar.
When this disappears you will be left with a message in the green bar saying done compiling.
This means that you have just compiled the program and there were no errors.
If there is any text in the bottom section saying error, see if you have loaded the correct program and are using the correct version of the IDE.
Find out where your variables are stored
sounds painful- but it is only referring to the parts of the printer software you will be changing are stored.
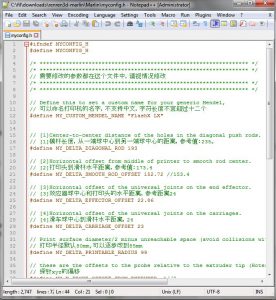

Open up notepad++
Open the file myconfig.h, located where you saved the marlin software – so in my case c:\renren3d\renren3d-marlin\marlin\myconfig.h
This is the file you will be editing to set some parameters.
There maybe a lot of characters you don’t understand, but there is enough english to follow along.
First programming
We now go back to the Arduino IDE
Now click on the arrow symbol under the edit menu
Again you will see ‘ compiling sketch’ come up and then it will say uploading
Wait for it to finish and you will get a success message come up.
The printer screen will go blank and then come back.
If you get the error – serial port not found
Then go to the top under the tools menu and make sure that you have selected the right com port for your printer.
To check which one the printer is – see all of the com ports with it plugged in, then unplug the printer and goto the tools serial port menu again. your printerport will have disappeared.
Plug the printer back in and select the port which has just appeared.
You now know that the software compiles and you can program your printer. excellent.
Check that you can control it
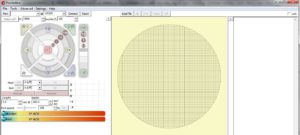

Now open up pronterface – double click on the icon on your desktop.
Set the port to your printer port and the speed to 250000 in the top left
Click on the connect button and you will see text scrolling down the right hand pane.
If not make sure your printer is switched on and plugged into the computer.
Make sure the port number is the correct one for the printer.
Pronterface is a program where you can manually move your printer, send it gcodes along with mcodes.
How does this benefit you, you ask
Well with this software you can check out your printer – even setup the software to move your printer to its extents with one button – more on that later.
How does your printer communicate with your computer
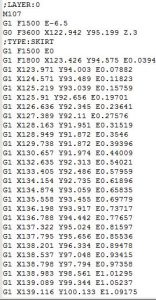

It’s all in codes – these are called gcodes or mcodes.
What do these mean, well there is a reference here.
But the gcodes are mainly movement codes with the mcodes being read back codes.
Do you need to remember them – at the start, yes but i will tell you what to type and what it is going to do so it shouldn’t be too much of a problem.
So what do we do first.
Checking the endstops are working and plugged into the right positions is a good start.
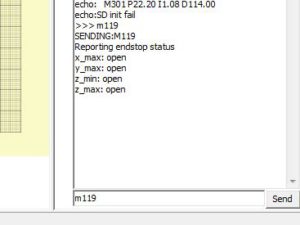

Type into the text box M119 (get endstop status), and press return
This will respond with the state of the end stops.
x_max open
y_max open
z_min open
z_max open
This indicates all of the endstops have not been reached.
note: the delta printers unlike the cartesian printers work on the maximum endstops.
If you press and hold the X carriage end stop and press return again then you will see
x_max TRIGGERED
y_max open
z_min open
z_max open
If you release the x carriage end stop and press and hold the y carriage end stop then press return
x_max open
y_max TRIGGERED
z_min open
z_max open
Similarly with the z carriage end stop
x_max open
y_max open
z_min open
z_max TRIGGERED
The z_min is the auto cal switch so pressing this will give
x_max open
y_max open
z_min TRIGGERED
z_max open
You now know that the end stops will be activated when the carriages reach the top of their travel.
we can now move the printer.
Manually move the printhead into the centre of the printer- the reason for this is that if the motors are going in the wrong direction then you have a chance of turning it off before it crashes.
Typing G28 ( move to origin (home)) into the box and pressing return
will send the printer home – towards the end stops.
If the motors go the wrong way or not all of the motors go in the same direction then switch off the printer and change the orientation of the motor which was going the wrong way.
The printer will got to the top of its travel and then reverse and come back out a bit, then reverse again and go in slower and stop.
By doing this the printer will achieve the best accuracy. Coming into the end stop fast the motor may overrun by a couple of microsteps and not come back to the same place every time. This will cause errors in the z axis and the level above the build platform. By coming in slowly the printer knows within one microstep where it is.
After travelling all the way to the top, your printer needs to know how far it is to the build platform.
We can interrogate the printer to see what its position is, type M114 (get current position) into pronterface and press return
The return data will be in the form of x:0.00 y:0.00 z:0.00 e:0.00 count x:0.00 y:0.00 z:0.00
What you will need to do is to measure between the nozzle and the build platform, it doesn’t have to be accurate to 0.1mm just to a rough number, so you can use a bit of string, mark it close to the end – hold this down onto the build platform and pull it up to the nozzle – pinch it here between your nails and then mark it. Measure it between the two marks. You will need the measurement in mm.
Changing your first variable
Now you will need to program this into the software, this is nothing to be worried about it is very easy with the tools available. After you have carried it out a couple of times you will have more confidence about the process. Is it necessary – unfortunately yes. With the delta printers there are a couple of areas where you need to program the software with parameters which are specific to your printer. So follow this procedure and before you know it you will be changing other things.
You will need to open the configuration file where you will edit the value of the z max value.
You are free to use any editor you like but you must make sure that it doesn’t add any formatting when saving.
I will be using notepad++ for the rest of this tutorial.
So open notepad++
and go to file → open.
Navigate to where you stored your marlin files, locate one called myconfig.h and open it.
A lot of the characters in here are in chinese, don’t worry there is enough english for you to change the right data.
Scroll down the file and look for the line which says
#define MY_MANUAL_Z_HOME_POS
This is the height above the build platform.
If your measured value is the same as the one already here– brilliant, if not then after this add your measurement. mine had 290.
So if you had 305mm the line would become
#define MY_MANUAL_Z_HOME_POS 305 //290//179.5//180.3
Any thing after // is not read by the program so you can have anything there.
Tip:
One tip I use is to change something I can see when changing a program.
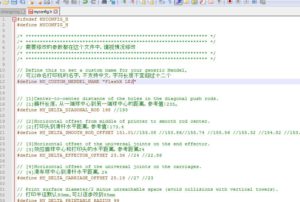

In this case the only change you will be able to see is the name of the printer.
I add a number after it to show that I have got the right program uploaded.
So scroll towards the top of the file to find
#define MY_CUSTOM_MENDEL_NAME “FlashX LX”
You can now change this to anything you want and it will appear on the lcd – remember that it is only 32 characters long and needs the word ‘ ready ‘ after the name.
So that lets out ‘ my new delta printer which I programmed 1’
I tend to just add a number to what is there
so my printer became ‘flashX LX1’
Save the file.
You now need to put the program together, or compile it.
Recompile the program
If you still have the Arduino IDE open you will need to close and reopen it.
Click on the file → open and navigate to where you stored the files.
Look for marlin.ino and open it.
The software will open a new window with all of the files you need.
As you cannot have two programs talking to your printer at once you need to disconnect Pronterface.
Click back on the Pronterface program.
Disconnect pronterface from the printer by clicking on the disconnect button at the top left.
Now go back to the Arduino IDE.
Make sure the program has remembered what it needs to program by looking down at the bottom right and seeing Mega2560 on Comxx. If this is not there then follow the setup detailed above.
If you click on the tick, under file, the software will put all of the information together and you will be presented with either a success or a list of errors. Hopefully it came back with success. This means you can program your printer.
If there are errors, make sure you didn’t change any thing else. Read what the error says and see if you can trace it back.
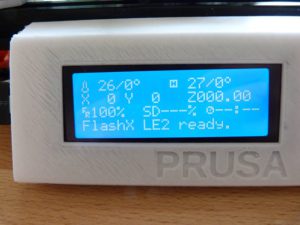

When you are successfully compiling your program you want to click on the arrow, this will compile the program and upload it to the printer. It will take a while. When it is uploading you will see the lights flashing on the Arduino board. When they stop and you get a success message in the Arduino IDE, the lcd will blank and restart – you should now see the name changed to what you set it to. You can now be sure the new program is loaded.
Yeah I know it says Prusa – I need to get around to changing that.
Setting the Z height exactly
We have changed the value in software so that it is very close to what we expect, now we have to make it exact to within 0.1mm over the full height range.
Click on connect in pronterface.
You will see the familiar text down the right hand side.
In the text box you want to type in
g0 x0 y0 z15 f3000
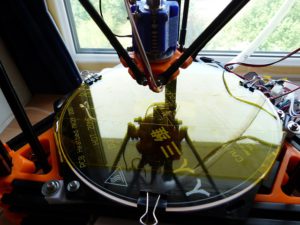

This is the command to move fast (g0) at a rate set by f in mm per minute, so 3000/60 is 50mm/second.
My printer z height measured 305mm so it would take approximately 6 seconds to go from home to the build platform.
We stop 15mm above the build platform to ensure that the nozzle doesn’t go crashing into the surface and damage it.
Your printer will move the nozzle down towards the build platform and stop 15mm (ish) above it in the centre.
Using the Z axis control at the top left of pronterface move the nozzle down towards the build platform.
Have a piece of paper ready as you want to stop the nozzle before it contacts the surface.
Insert the piece of paper between the nozzle and the surface of the build platform.
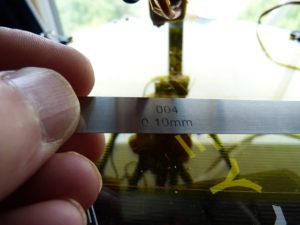

What you are looking for is to have the nozzle pinch the paper loosely, you can still move it but the paper starts to have resistance, occasionally it will snag and bunch up, but you must still be able to move it.
Another piece of kit you may want to invest in is a set of feeler gauges – this will make setting the nozzle more accurate. If you use the 0.1mm feeler gauge and set the nozzle so that you can feel resistance on the gauge when running flat on the surface ( I stripped mine down and only use a single one flat on the build platform. Sliding it around with a finger while lowering the nozzle onto it. You will feel when the nozzle just touches it).
Hopefully this is reached before the Z reading goes to 0.00. if not you will need to increase the value you programmed into
#define MY_MANUAL_Z_HOME_POS
and try this again, unless you can measure the distance remaining accurately.
If you reach the pinch point before z=0.00 then make a note of the value as you will need to subtract that from the value programmed into myconfig.h.
My printer reached z = 0.40 when the nozzle went tight.
I programmed 305 into the manual z home position so I will need to subtract 0.4 from this
305-0.4 = 304.6
so I go back to notepad++ and alter the line
#define MY_MANUAL_Z_HOME_POS 305 //
to read
#define MY_MANUAL_Z_HOME_POS 304.6 //305 //
I also change the name of my printer
in this case I changed it to
flashx lx2
and saved the file.
Programming the printer again
I have found that you need to close the Arduino IDE and reopen the marlin.ino file, this forces it to take notice of the updates.
If you don’t do this I found that it would still use the old values, it confused me for a while until I started to change the name of the printer and saw that wasn’t changing. Meaning the latest values weren’t being used.
So click the disconnect button in pronterface.
Click on the arrow in the Arduino IDE and wait for the program to be uploaded.
The lcd will go blank and then display the new name of your printer.
Connect your printer with pronterface and type G28 (home) into the text box to send your printer to the home position.
Now type in g0 x0 y0 z15 f3000 ( go fast to 15mm above the 0 position)
And wait for your printer to come to rest.
With the Z axis control bring your printer slowly down towards the bed.
Using the piece of paper or the feeler gauge check the zero height of the printer.
Frustratingly I had to go through this a few times before I got the right value, so don’t feel bad that you might have to do this as well.
It is not your fault, it may just be rounding errors or pronterface may not move it as far as it thinks it has. What is important is that you set this correctly.
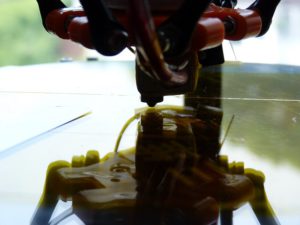

You will be extruding plastic with a diameter of 0.4mm, you are expecting this to be stuck to the build platform and you need to have your printer know that it is within 0.1mm of the surface, so take your time and get it right.
Easier than typing it in constantly
Tip:
What we can do is to save you typing into pronterface the commands all of the time. There is a method of setting up custom buttons to carry out complex tasks if you want.
To get a home button you need to type into pronterface


button 1 “home” G28
This will produce a button in the middle pane at the bottom.
You can now type into the text box
button 2 “z zero” G0 x0 y0 z15 f3000
This will produce a second button which will stop your printer 15mm above the build platform.
Now you can just click on these to send your printer home or send it towards the build platform.
You now need to go onto bed levelling before your printer is ready for printing.
These types of printer are fascinating but a lot more work than cartesian printers to set up – don’t let that put you off.
To watch the dance of the carriages move the nozzle around the bed is mesmerizing, along with the song of the printer.
I can watch mine for hours, except I need to produce more posts!!!
Congratulations on getting this far, you are not far off from having a printer which will start producing all of those models you have been downloading, all of those jobs you look at and think – I can draw something up to fix that.
If you have any questions or problems with your printer after getting this far leave a comment in the box below.
This has been the fourth post in the build your own 3d printer kit.
Thanks for reading
Phil

Looking for help getting my Renren3d working with Marlin 1.1.5
wondering if you could send me your .h files so I can compare and see what I don’t have correct.
Hi Mike thanks for dropping by.
I can send you those files, will send the original and my modified version.
Just remember all of these printers are different , so what works for mine may not work 100% for yours.
You may need to tweak it a bit.
What are you having a problem with?