
This article is how to find out whether your Anet A8 hotend has been assembled correctly.
Common Problems with the Anet A8 hotend
There are three main problems associated with the hotend which will be dealt with in this article.
- Filament leaking from the top of the heat block
- Filament leaking from the bottom of the heat block
- Hotend loose when heated.
When you receive your Anet A8 the hotend will probably be assembled, mine was. What you don’t realise is that it is probably assembled wrong – as mine was!
You assemble the unit onto the printer and start printing.
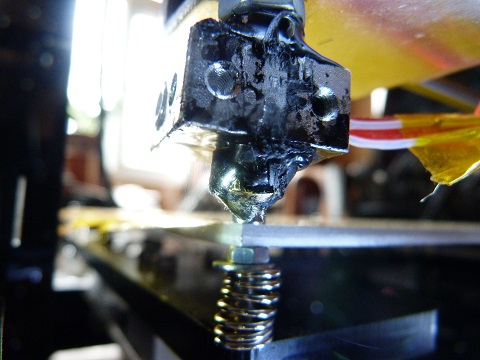
After a short while there appears at the top of the heatblock some molten filament.
If you are unlucky this can increase and drop down onto your printed model and either catch with the nozzle or cause detaching problems when the nozzle knocks your print off.
In the best case where it doesn’t drip you are left with a lot of filament stuck to the top of the heat block, requiring cleaning up.
Or the filament starts oozing from the top of the nozzle and drips onto your model causing problems.
Or after heating up the printer you start printing and notice that the heatblock is spinning around and causing printing problems with your model.
Whichever it is this needs to be rectified.
What is the hotend made up of?
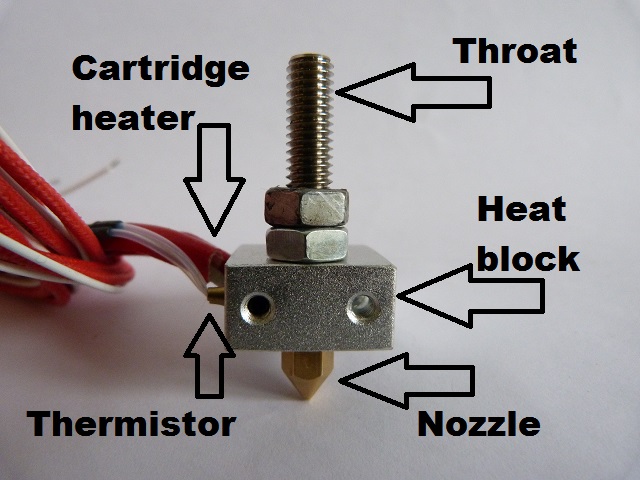
The Hotend is contructed of a few parts. these include:
- The throat
- The liner
- The heat block
- The cartridge heater
- The thermistor
- The nozzle
The liner is usually made out of PTFE material, slippery and heat proof. This is the insulation while the filament goes through the extruder.
The PTFE tube is fitted inside the throat, made of stainless steel. It goes right down to the bottom to be butted up against the nozzle. The throat forms the connection between the extruder and the hotend. It also forms the heatbreak to prevent heat from the hotend from backing up the throat causing blockages.
The metal heater block holds all of the parts of the hot end block together.
The Cartridge heater, a 12v 40w heater raises the temperature of the heat block above the melting point of the filament.
The thermistor gives the controller some feedback on the temperature of the heat block. Once close to temperature the heating is cut back so that it doesn’t overshoot. It closes the loop of the cartridge heater into the heatblock to the thermistor, back to the controller.
The nozzle is the melt zone. Once liquid the filament is forced through the opening in the tip of the nozzle. The semi melted filament forms a plug which pushes the molten filament out of the nozzle.
How to disassemble your hotend properly
Once you have used your hotend it will be full of filament.
If you try to disassemble this when it is cold then you stand a good chance of breaking it.
If the nozzle has stuck this can shear off when trying to unscrew it.
Or the throat may snap, again with the filament stuck to it.
So what do you do?
I tend to cut off the filament at the top of the extruder rather than trying to remove it by pulling out.
Switch your printer on and warm it up, it doesn’t have to be at the melting temperature, just above the transition temperature from rigid to flexible – which on PLA occurs at about 50C.
So set the printer to preheat PLA – if PLA is what you are using, and go back to the main screen. Watch the temperature until it rises above 60C and you can then switch the printer off.
To remove the nozzle at this time, use a pair of molegrips ( visegrips) to hold the heatblock- carefully avoiding the heater cartridge and themistor.
With the correct size spanner unscrew the nozzle. This should turn relatively easily now the plastic is warmed.
Place it down on something that can withstand the heat without melting or being damaged. – I put it on the printers bed.
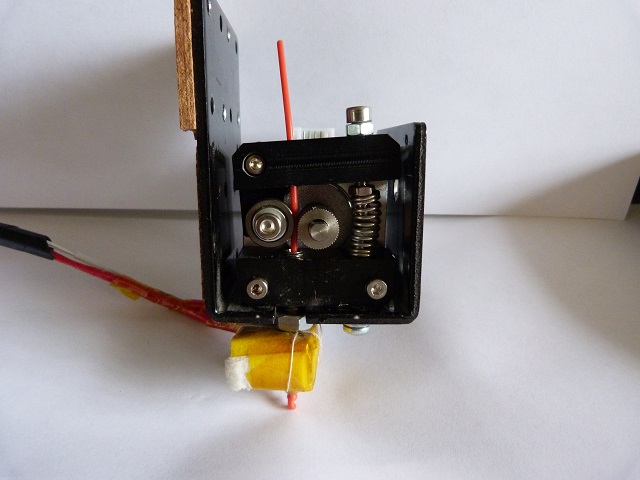
On the Anet A8 the hotend is held in place with the lower bracket of the extruder motor.
If you undo the nut and the allen bolt holding this bracket to the frame and the two screw holding the extruder motor you can remove the throat/heatblock/retainer completely.
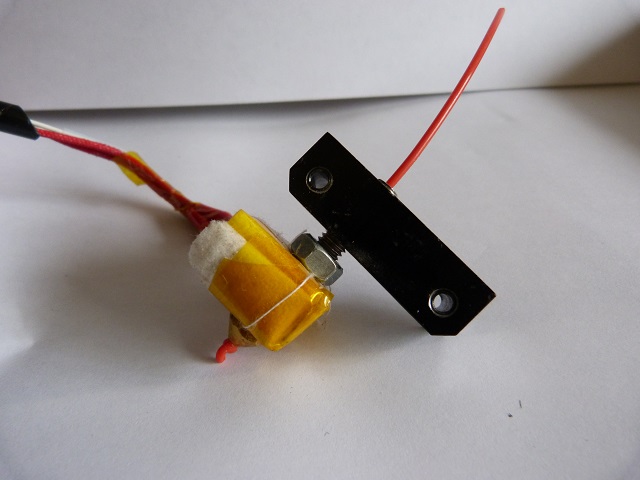
Now while it is still warm the nut can be tightened up to the mounting block and the heatblock gripped in the molegrips again.
The throat can be removed from the heatblock at this time.
If it proves difficult then remove the mounting block and add another nut to the throat.
Tighten the two nuts together, and using a spanner on the nut closest to the heatblock, use the molegrips to remove the heatblock from the throat.
You may need to clean out the threads of the heatblock or replace it if there is damage to the threads.
Check the throat for damage to the threads or to the PTFE liner. If it is blackened it may have been overheated or bits of filament may have overheated – these can break off and cause partial blockages in the nozzle while printing.
As they are only a couple of dollars then replacement would be the
best move – keep these in stock as consumables.
Remove any remaining filament and make sure that all of it is cleaned before reassembling.
Assembling Your 3D Printers Hotend Correctly
To assemble your hotend correctly make sure you have all the pieces available.
Nozzle, throat, heatblock and that’s it. If the heatblock has the cartridge heater and the thermistor installed make sure you are careful with the wires. You don’t want to reassemble the hotend onto your printer just to have the wires break.
Personally I reassemble the hotend cold and have had no problems, others are not so lucky and perform the last stage hot. This is something you will need to try and see which way works best for you.
Taking the nozzle, screw this into the heatblock by hand until it goes
tight.
Then unscrew it by 1/2 a turn.
Now take the throat and screw that in until it is stoped by the nozzle.
Using the molegrips, hold the heatblock to stop it rotating while using a spanner to tighten the nozzle onto the throat.
Don’t over tighten the nozzle, it need about 1/16th of a turn to take up any slack in the threads and to prevent it leaking from the joint between the nozzle and throat.
After you have tightened this examine the nozzle to see that there is still a small gap between the body of the nozzle and the heat block.
Now the nut to hold the hotend to the extruder can be screwed down the throat, if it was removed.
And the mounting block screwed onto the throat.
The throat end should come to the top of the mounting block or slightly protrude. The wires for the heater and thermistor will orientate themselves to the correct position as they were when you took the assembly off.
Offer the assembly up to the extruder and screw in the allen bolt – do not tighten. Align the mounting block and tighten the nut up to the extruder mount. Tighten the allen bolt.
Place the spring for the extruder in the correct position and holding down te extruder motor screw this back in with the two allen bolts. It is easier to locate the one furthest away from te spring first and using that as a pivot locate the one closest to the spring – then tighten both up.
You now have a reassembled hotend which should not leak.
Note: if your hotend becomes loose when you have heated it then hold the heatblock in molegrips and tighten the nozzle – make sure it is not tight against the heatblock when fully tightened.
Testing your hotend
Switch on your printer and make sure that it starts up ok.
Locate the hotend temperature menu and start the process.
Go back to the main screen and watch the temperature rise on the hotend.
Make sure it stabilises where you set it.
Straighten the end of your filament and feed it into the extruder. Pressing down on the tension spring will allow you to feed the filament in without turning the motor.
Manually push it through until you see filament coming out of the nozzle.
Stop pushing. and release the tension spring.
Look for signs of leaking, both at the top and bottom of the heatblock.
If there are then hold the heatblock with the molegrips and tighten the nozzle.
You now have a working hotend on your 3d printer which will not leak.
After clearing and reassembling your hotend you will need to go through leveling your bed as the height of the nozzle will not be the same as before.
Other solutions for the Anet A8 hotend
I have heard that people are putting teflon tape around the threads to prevent leakage- if you get the joint tight between the nozzle and the throat then you really don’t need anything else.
And don’t use thread lock on the threads of the throat as you may not be able to disassemble it in the future. If there is still a problem then the joint between the nozzle and the throat is not correct and needs attention.
If you really cannot get it to stop leaking then try to flatten the faces of the nozzle and the throat on some wet n dry paper – if you don’t get it really flat it may cause more problems than solving.
The complete new assembly is available relatively cheaply to purchase from Amazon. Don’t forget to check it before fitting as most manufacturers don’t assembly these properly from the factory. Go through the assembly process of loosening the nozzle and tightening the throat down onto the nozzle.
If you find that the teflon tube is blackened at the end where it meets the nozzle, it will be worth checking your temperature settings for the material you are using. too hot and it will start to overheat and stick internally leading to more blockages.
I tend to polish the inside of my nozzle before the first fitting – does this do anything? well I have very few problems with partial blockages so every little helps, and it only takes a few minutes.
Thanks for reading and please fill in the survey whether you tightened your anet a8 hotend hot or cold.
[poll id=”3″]
Phil
I tried all of the tips you gave and still had leakage. I cut gaskets from paperboard and that has cured all my problems.
It does sound like the ends of your throat and the nozzle are not flat to each other – so you will get leakage, it won’t matter whether you tighten hot or cold.
Adding the gaskets will help for a bit – i don’t know what paperboard does at the printing temperatures. worth looking into.
If it is cardboard then the burn temperature is around 232C ( just above the temp for pla) so just be careful what you put through your printer…
the other thing to bear in mind is breakdown- if any of the material breaks off and causes blockages in the nozzle then you will be getting more annoyed.
I agree in principle that a gasket would take away any variance of hte end flatness of the throat and nozzle but would aution on the materials used
You could look at using a couple of layers of kapton tape as it shouldn’t need to be too thick.
but thank you for pointing this out and i hope your hot end doesn’t leak into the future.