A little while ago a friend had a problem of the build platform heating up when printer first switched on. He asked why?
Make sure you are not seeing residual heat from the last print. Leave the printer on for a couple of minutes and watch for a temperature rise on the heated bed before going through this fault diagnosis.
If you see the bed temperature rise above 50C on it’s own ten switch off and follow this fault diagnosis.
To see what is happening here we need to examine how the heated build platform is wired.
On the Ramps1.4 board


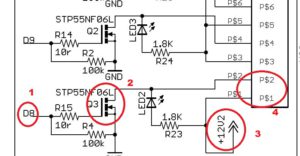
The 12v feed (+) (3) is fed to the build platform heater ps1 (4).
The return from the heater ps2 (4) is fed back to a FET (dc switch) (2) and onto to the power supply return (-).
The control is from the Arduino on D8(1) and it is pulled down to ground to prevent it from switching on when not connected to the Arduino. The Arduino has to pull the pin D8 high to switch on the FET and allow current to flow through the heater.
So if the build platform is heating up when the printeris first switched on: What is happening?
There is current flow through the heater when the printer is switched on.
This can be caused from three faults
So how do we find out which fault is causing the build platform heating up when printer first switched on.
Short in the return wire
Remove the wire from the connector ps2.
Switch the printer on and if the build platform heater heats up then there is a short in the return wire from the heater to ground.
This can be confirmed with a multimeter, used in the ohms range and connected between the wire and ground. Make sure to switch the printer off when checking this.
If the multi meter reads <1r then there is a short to ground.
If the multimeter reads >100k there is no short to ground.
If the wire is shorted,trace the path of the wire back to the build platform to see where it is shorted. A lot of time it will be due to excessive heat on the insulation of the wire.
This will cause the insulation to melt and potentially cause a short.
The solution for this is to replace the wire. Ideally the wire should be replaced with a higher temperature insulated wire. Ptfe insulated wire would be ideal.
If you have some of this or can get hold of it but in a smaller diameter you can always add more than one piece. Running several parallel wires to the same place will reduce the resistance, and therefore the voltage drop across the wire.
Repair the wire and check the resistance to ground – it should read >100k
reconnect the wire to ps2.
Switch on the printer to ensure that the heated build platform now behaves itself.
So what about if the FET has gone short?
How can you tell.


Use a multimeter switched to the ohms range.
Place the probes between ps2 and ground.
If the FET is shorted then the resistance between these two points will be low <1r
To repair the fault you can do one of two things
replace the FET, currently a STP55NF06I, N channel 60v 20mR 55A TO-220 FET has been used.
Replacements are available from ebay
or Amazon
Use static precautions to prevent damage to the device when replacing it.
Touch the item you are going to connect to and the item you are connecting at the same time – this way the potentials on both items will be the same.
Make sure you orientate it correctly. Take a picture of it before you remove it to ensure that you fit it the right way round.
Or
purchase an external replacement. Like this one from Amazon
This takes the signal from D8 and you connect the power supply and heater as directed.
With this option you will only be connecting a thin wire from D8 to the board for control, you are not replacing the FET.
If the FET resistance is >100k then this should be ok.
D8 arduino faulty
The next test is to switch on the printer and using the multimeter on its voltage range, to check the voltage between D8 and ground.
If this voltage is low, check the voltage at ps2. This should be 12v.
If the voltage at D8 is high, check the voltage at ps2, this should be 0v.
If the voltage at D8 is high all of the time then it would appear that you may have a damaged Arduino board.
To verify this switch off the printer and separate the Arduino board from the ramps board and switch the printer on.
Check the voltage at D8, it should be 0v. If it is then the Arduino board is faulty.
A replacement is available (#amazon link) here
Take anti-static precautions when handling the new board and plug it into the ramps board.
Remount the two boards and reconnect any wiring disconnected, ensure you have placed any connectors the correct way round.
Switch on the printer and verify that the heated build platform only heats up when commanded to by the controller board.
Finally sorted the build platform heating up when printer first switched on problem


Remember when you have repaired the fault to test the machine before going ahead and printing a complex piece. Print a few test pieces – 20mm cube, 3d benchy. Just to make sure the printer is now ok.
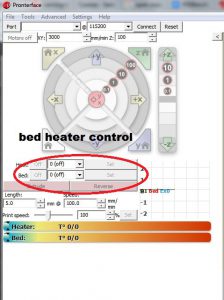
Test the repaired element independently if you can – in this case you can use pronterface to switch on and off the heater to ensure that it is working correctly.
I am not a fan of low level switching and will replace my switch – if it goes faulty with a high level switch. This means that I will be switching the positive supply rather than the negative. This one less fault – if the return is shorted it doesn’t matter as the supply is removed with the high level switch.
If you have come cross any other faults which cause the symptom of the build platform heating up when printer first switched on, then please tell us what is was and how you fixed it in the comments box below.
Many thanks for reading
phil
