Another post in the 3d printer project ideas series.
others include :
What would you use your 3d printer for?

My partner has a 1985 vw scirocco gtx. Very nice model. She has just had a bit of work carried out on it to keep it going for a few more years.
It now looks very nice, but it developed a problem.
When started it revved to about 2000 rpm on idle and wouldn’t decrease.
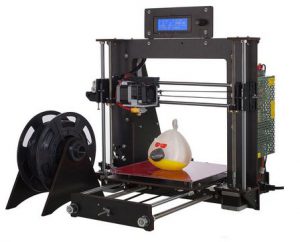
Read more to see how my Prusa i3 3d printer fixed a car…
Vw scirocco fuel system quick run through
The 1985 vw scirocco I am working on has a mechanical fuel injection – the K-jetronic system.
This is the fore runner of the electronic fuel injection systems found on most cars today.
It is an open loop system with a throttle valve controlling the amount of air entering the engine.
This air pulls up on an air valve which pushes a plunger releasing fue`l to the fuel injectors.
The injectors are switched on when the relevant cylinder is on its inlet stroke.
There is no oxygen sensor, as fitted to most modern cars and no electronics to control the amount of fuel. There are various temperature sensors and another cold start injector.
So it is a basic system but very effective. It was used on numerous cars, not just vw, over an eleven year period.
Investigations into why it was revving
To me the over revving on idle must be an excess of air coming into the engine.
Removing the cover to the air valve, it appeared a little dirty so was cleaned.
The cover, part of the air intake was replaced. This made no difference.
At the other end of this air intake system was the throttle body.
So that is the next logical step.
Removing the air intake cover from this unit showed that it was covered in carbon build up from the engine.
So I decided to remove this to clean it.
There are only four allen headed bolts holding this unit onto the inlet manifold, so it should be a five minute job, with the right tools to take it off.
Four hours later, after rounding one of the allen bolts. I managed to remove it with use of mole grips and a hammer and chisel. I won’t be using that bolt again.
The inside of the throttle body was caked in carbon deposit, I was surprised that this had not been cleaned when the work was carried out.
Under the throttle body I had noticed something electronic. Before removing it I had checked in the Haynes manual and found it to be an idle switch.
Checking the resistance of this both in the idle position and open throttle the resistance did not change.
After removing the throttle body the reason became apparent. Where the switch mechanism was supposed to be was a hole into the switch.
Oh well, need another one of those then.
So I cleaned up the throttle body with fuel injector cleaner, cotton buds and a lot of paper towel.
The idle screw was removed and the airway to this was cleaned up.
When cleaning the idle screw I noticed a filament like piece coming out of the thread.
I cleaned the brass threaded rod up and re-inserted it into the throttle body.
It was now loose – Oops! so that filament was important.
Having a look around I remembered that I had replaced a watch back o-ring a few weeks ago and we had bought a pack of 200 o-rings from amazon for next to nothing.
Looking in here I found a large o-ring which fitted into the bottom of the thread. This has the effect of allowing the idle screw to be turned but not vibrate loose. So that was now fixed.
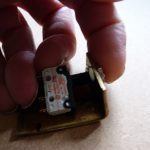
The idle switch was another problem, with the work I used to do I know about microswitches. And I knew the price they should be. For one of these off the shelf with an ip67 (water and dust proof) rating it should be a couple of quid.
I looked online and found the original part number for vw. I was amazed at the £57 to £77 price tag. Wow I hadn’t expected that. It is now no longer manufactured, so people are pushing the prices up, using scarcity tactics to inflate the prices.
As I have a habit of keeping most things, I looked in my ‘junk’ drawer – gold dust to others!!!
I found that I had a smaller microswitch, with different mounting points but it was ip67 rated.
I came across an over travel kit for the switch as well. This is a sprung piece which protects the microswitch from damage if the piece activating it happens to move too far. In the case of the throttle body and setting up I thought it would be a good idea.
As the mounting point were different I needed to manufacture a bracket for it.
I should of thought at this point about the 3d printer but didn’t. I got my hands dirty with a piece of brass, 1.5mm thick and bent it in the vice. Using my drill press to drill the locating holes along with another hole for the switch.
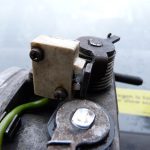
The bracket and switch were mounted to the throttle body, and adjusted to suit the specification.
All I had to do was to wire it up.
Taking the original broken switch, I drilled out the securing rivets on one side and carefully lifted the lid.
The two wires were soldered to the terminals of the switch, so removing them would be no problem.
Looking at the condition of the inside of the switch, I couldn’t help noticing it was very clean.
I pushed a cocktail stick down the hole for the activator and found that the switch still worked.
So now I was torn between trying to repair this switch or using the new switch.
I knew that this switch would do the job if it worked, but the new switch I had invested time into making a new bracket and fitting it.
As it was coming up for dinnertime I decided to measure and draw up what I thought would fit into the hole and become the activator.
Drawing up a square rod with a round button on the top, using the fillet function to make the top rounded and look pretty.
I sliced the model with cura and decided to print 5 off, in case the first one didn’t work I had a few spares to play with.
I printed these off in white PLA, checking the first layer before leaving it for lunch.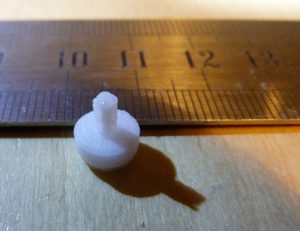
Coming back after lunch, I found that they had printed out ok, I had used the brim function due to the small surface area touching the build platform.
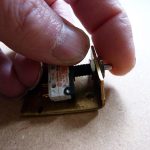
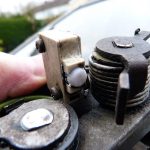
Removing and cleaning up one of the buttons I found it fitted into the hole and when pressed there was a nice sounding click from the switch mechanism as the contacts changed over.
Ok so now it fits in there but without a retainer it will just fall out, so I used my soldering iron to melt some of the pla inside the body to prevent the button form falling out.
A word of warning if you decide to do this – PLA is nothing like ABS or other plastics. It melts very – I mean very easily and using a soldering iron set at 400C is really overkill. It almost vaporized the peg inside the body. I managed to control the melting and formed a couple of barbs to prevent it falling out.
The outside of the switch had a rubber seal where the original button was fitted. The new printed button covered over the top of this and almost sealed it, but I thought of using some silicone sealant to add weather proofing.
I also added a couple of stringy bits onto the button to assist in the retention of the button.
This repaired switch was fitted back onto the throttle body and the operation checked.
It worked.
So I then spent an hour putting back all that I had taken off and disconnected to remove the throttle body.
We started the car and the idle speed was adjusted when the engine was warming up. This will need some more adjustment once the car is warmed up.
The initial idle speed is now about 1600 rpm and reduces as the engine warms up, down to about 900 rpm.
I am happy this is now working. With the switch stuck on, the air bypass valve for the system was open continuously and allowing too much air in. this was causing the engine to race on idle.
I will need to keep an eye on the button as I manufactured it in PLA. I am aware of the low temperature melting point of PLA, so will need to get a different material – like abs if there are any issues with the button deforming.
So I have saved money and got the car working with the use of a 3d printer.
What have you saved with your 3d printer – leave your story to inspire others in the comments section below.
Thanks for reading
Phil
ps – my partner is very happy that she has her car back. I am happy that I have managed to repair the car with the printer.
Another post in the series 3d printer project ideas.

Hi Phil,
Very happy? I am over the moon at your inventiveness and resourcefulness!
The 3D Printer is an amazing piece of kit, being able to replace broken components on a car, or condiment grinder or improving the look of a cooker by designing your very own cooker knobs.
I am amazed and impressed at what can be done with a 3D Printer – the possibilities and potential are only limited by your imagination!
Kaz 🙂
Hi Kaz,
Thanks for stopping by, I’m glad that I have the tools to be able to create what we want or need. It is fascinating how much of life can be changed by a piece of plastic moulded into another shape. As you say from the salt grinder through to the repair of the switch on the car – 3d printing is starting to impact all of ours lives whether we know it or not.
Who knows where the possibilities end – now printing metal, albeit with post heating – is a realty then there maybe no end to what is possible.
Phil