
At the start of your printing journey you may be overwhelmed with every thing you need to do to get a
good print…
This guide will go through the essential settings a beginner must be aware of when using their slicer…
But first we need to see where it fits in the workflow…
Where does the slicer fit in the 3d print workflow
Your slicer software carries out the task of combining your cad model with your printers capabilities…
In the 3d printing workflow you
- Download or design the 3d model in cad
- Output the model in stl format with enough segments to print a good model
- Input the stl file into the 3d slicer
- Set up the printer capabilities into the slicer
- Setup the material parameters
- Setup the print quality
- Create a gcode file
- Load the gcode into the printer
- Analyze- verify quality…
So you can see that in the slicer is where everything comes together…
The printer, the material, and the print quality…
So let’s have a closer look at how the slicer can combine all of these things…
The slicer printer settings
When you open your slicer you need to make sure the right printer has been selected…
As i have more than one printer i have been caught out on a couple of occasions when rushing with the wrong printer being selected…
This hasn’t caused any major catastrophies, but has caused some interesting effects…
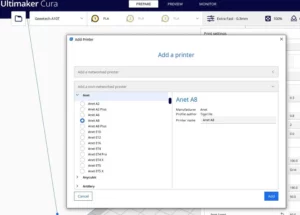
To add your printer in Cura,
Click on settings>>printer or add new
If you have your printer networked and switched on then it may pick this up automatically…
But i don’t recommend printing over the network as more issues may occur…
So clicking on ‘add a non networked printer’ will allow you to add an offline printer…
You are now presented with a list of manufacturers and model to choose from…
If your manufacturer is there then click on it and select the model you have if it is present…
I chose to add an anet a8 printer
It really is worth checking the printer settings as on my a10t the heated bed was not ticked….
So a quick check of the bed dimensions, along with the maximum height…
The start code needs to be relatively simple…
Home the printer
Raise the nozzle so it won’t hit the bed when traveling to the start position…
With multi nozzle printers you may get a purge line to clear the nozzles, or mix the nozzles to ensure the filament is going to be present when needed…
The same with the end code, it needs to be simple
Switch off the temperatures
Move the nozzle up from the printed model
Move the nozzle to the side of the model
Move the print bed to its home position
Release the motors to allow easy movement of the print bed…
Looking at the gcode for the anet a8 at the start we have
G28 ; home
G1 Z15.0 F2000 : move the nozzle up 15mm
And at the end we have
M104 S0 ; set hotend temp to 0
M140 S0 ; set Bed temperature to 0
G92 E0 ; select extruder
G1 E-10 F2000 ; retract filament 10mm to prevent oozing
G28 X0 Y0 ; auto home x and y…but leave height alone
M84 ; disable the stepper motors
So you can see this start and end code added to the main gcode will work…
Once you have checked these settings you don’t need to check them every time as they are saved…
Now onto the material you want to print with
The slicer material settings
The way the printer filament is processed is very important and can ruin a printed model if not set
correctly…
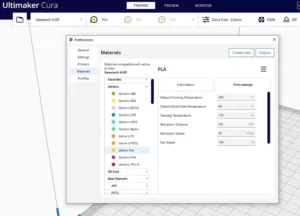
So check what the manufacturer has printed on the label of the spool…
Note the printing temperature and bed temperature ( if applicable) and any other requirements…
If you are using pla, as most of us do…then selecting pla as the material and if you can see your brand then even better as this will have a custom profile…
But you can still adjust the settings if you know how your material prints….
You can add your material to the list to allow easy selection in the future and tweak the settings to get the optimum printing.
So you have now selected your printer and the materials it is now time to look at the print quality settings…
The slicer print quality settings
This was left until last as these are the settings you will be adjusting the most…
Depending on how you setup your slicer you can get access to all of the settings or a very basic selection.
At the start of your printing journey then i would suggest only the basic settings and review the main settings…
Print the model and look at it, if you are not happy with the quality the start tweaking some of the settings – but only adjust them gradually and one at a time , or you won’t know which one has improved the printing….
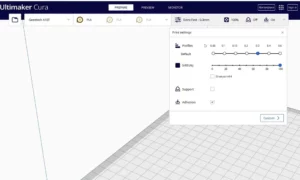
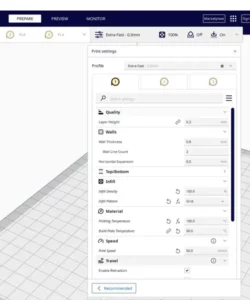
In cura when you want to set the quality you click on the settings box to the right…
And if recommended is not clicked then click it now…and you only get a few settings to adjust…
Which at the start is good…
These are layer height, infill, support and adhesion…
If you are like me and know that the front left corner of your bed is the ideal place to print, then you have moved the model from the default center placement to the corner with the axis shown…
Let’s have a look at each of these and how they affect the print quality
Slicer layer height
Changing the layer height will change whether you can see the layers in the final print…
So you may think …well that’s it i am going with 0.06mm for everything…
Until you realise that printing anything of any height will takes hours…
In 1mm height you will need to print 17 layers…so a 20mm test cube will have 334 layers….
It will consume about the same amount of material as one printed at a layer height of 0.3mm but take 5 times as long….
So you may want to save that for when everything has been ironed out in the printing and you want to do minimal post processing….
My standard is 0.2 or if i want a quick look 0.3mm…
It is not good practise to go above 0.75 times your printer nozzle diameter…and as most are fitted with an 0.4 mm then 0.3 is about max…
The software does allow you to select up to 0.6mm without showing an error, but behind the scenes it has a warning…
As the layer height is effectively what the slicer is all about then you try to go for the best quality and an acceptable print time…
So you may set the layer height to a nominal 0.2mm or draft quality and take it from there after you have set up the other recommended settings…
The next one is the infill
Slicer infill setting
Most models have two outside walls and maybe a top and bottom…
So for easy reference take a cube…you got that in your mind…
Ok so the printer prints the bottom…no problem…
Then it prints the side walls with a certain thickness ( called shell thickness) …no problem…
Now it prints the top…but this is printing over free space or overhang…
If your printer is not set up extremely well the filament at the top will droop and not be a flat surface…
The other problem is that the walls are only 0.8mm thick and a bit flimsy, so can be easily damaged…
How do we get around both these problems….we use infill…
Well you could say that just print it in solid and that will take care of it.. and i agree…in principle…
But…there usually is one of these…the material must cool and printing a solid cube of material the center will not cool quickly and cause surface defects….
So you could print a layer and wait for it to cool…then print another ..wait ..and another…and so on until the model has been fully printed…
And how much material and time has that taken…there are cases where you will need to have 100% infill or a solid model but not many times
A better way is to only fill the insides as much as necessary…
Do you just want it to support the top surface while printing …then use a small amount…or you can use gradual infill that increases as it comes closer to the top
Do you want it to be maximum strength without flaws…then use between 40 and 80%….
And you can have different sorts of infill…different printed shapes…but that is in the more advanced settings…
So now we have your print filled what’s next….ah overhangs…
Slicer support settings
So instead of a cube you have a cross…so an upright with two arms coming out…
Your slicer will slice anything you ask it to….but can you print it…that is for you to judge, knowing your printer…
But for me any overhangs further out then a few mm’s or over 50 degrees then they need supports…
So the cross above, it would print the main body fine…until it comes to the arms…
Then it would be printing in free space…and that really would not work…the molten filament would droop to unknown levels and there maybe something resembling arms, but not as shown in the model….
So how can we print this sort of thing…
Well you need to print a structure to support these arms….it doesn’t have to be too strong or permanent as it is waste material… so a very thing structure just to support any outlying parts of the model…
And Cura does have this…even in the recommended settings…you don’t get to choose any of the more advanced settings but at least you can support your models arms…
And talking of support….what if your model was an upside down pyramid with the point on the print bed…and the base in the sky…what chance do you reckon we have of printing that…
And this is where we come in with the next slicer setting…
Slicer bed adhesion
What if the model only has a very small point of contact to the print bed…
How far up the model do you reckon we would get before it became detached and a bird’s nest was the only thing printed…
It does happen to all of us…bed adhesion can be a right pain…and not only with a small footprint on the bed…i have have parts warp off the bed and start to move around…
But there is a setting to help us maximize the chances of getting these parts printed …
And that is called adhesion…
In the advanced settings you can add a brim or a raft to help…
What are these…
Well the brim, is like a brim of a hat- a single layer printed in touch with the part of the model printed on the bed…you can set how far out it extends, and this needs to be taken into account if you place it at the front left corner…
And the raft…is well…a raft…anything that is uneven on the bottom and doesn’t want to show what the surface of the bed is like can be printed on a raft…
This is a sacrificial structure to even out te difference between the bed and the bottom surface of the model…
So say you were printing a rock, the bottom of this doesn’t want to be flat as the build plate is, but wants texture and maybe a few bumps…then you print a raft that is flat on the bottom and the top surface conforms to the bottom surface of the rock…with a small gap between to allow easy separation…
Summing up
So for the easy recommended settings that is all you have to go through…
If you click on the custom button then you get to see what is lurking in the background, which can overload you at the start…so stick with the recommended until you have a few prints under your belt…
But if it really is not printing well then make sure to check all the above settings and make sure they are close…
So you are setting the slice thickness, infill percentage, supports on or off, adhesion on or off.. and that’s it for your first few prints…
And you have checked that you are using the right material and the correct printer…
After pressing slice always make sure you just have a quick look at the preview to see if there are any parts you have missed…this will show you all the supports and adhesion methods slice by slice…
Happy printing.
The above is mainly based on Cura slicer the other slicers will have a close variance to this…